
Hi all! Affmy media-buying team here, and today we’re going to tell you how to drive RollerAds traffic to our in-house offers. For the job, we took three offers: DateMinx, JoinTheDating, and MapMyMilf (as a matter of fact, the latter has been explored for the first time).
Traffic source: RollerAds
Advertising format: Push notifications
Period: 06.05.2021 – 06.18.2021
Affiliate network: Affmy
Offers: DateMinx, JoinTheDating, MapMyMilf
Cost: $586.68
Revenue: $788.4
Profit: $201.72
ROI: 34.38%
Choosing the traffic source
In our previous materials we’ve demonstrated successful cases of working with push networks and this time we’ve decided to test push notifications from RollerAds. This advertising network attracted our attention for the following reasons:
- Minimum CPC of only $0.001
- Responsive support team
- Subscription age targeting
- Exclusive monetization of all the publishers’ traffic with SendPulse
- Many advertising formats: Push, Popunders, In-Page Push.
Setting up the tracker
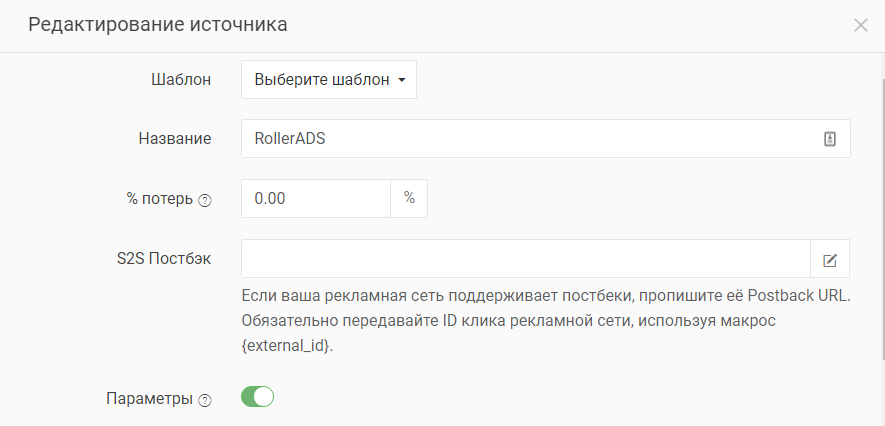
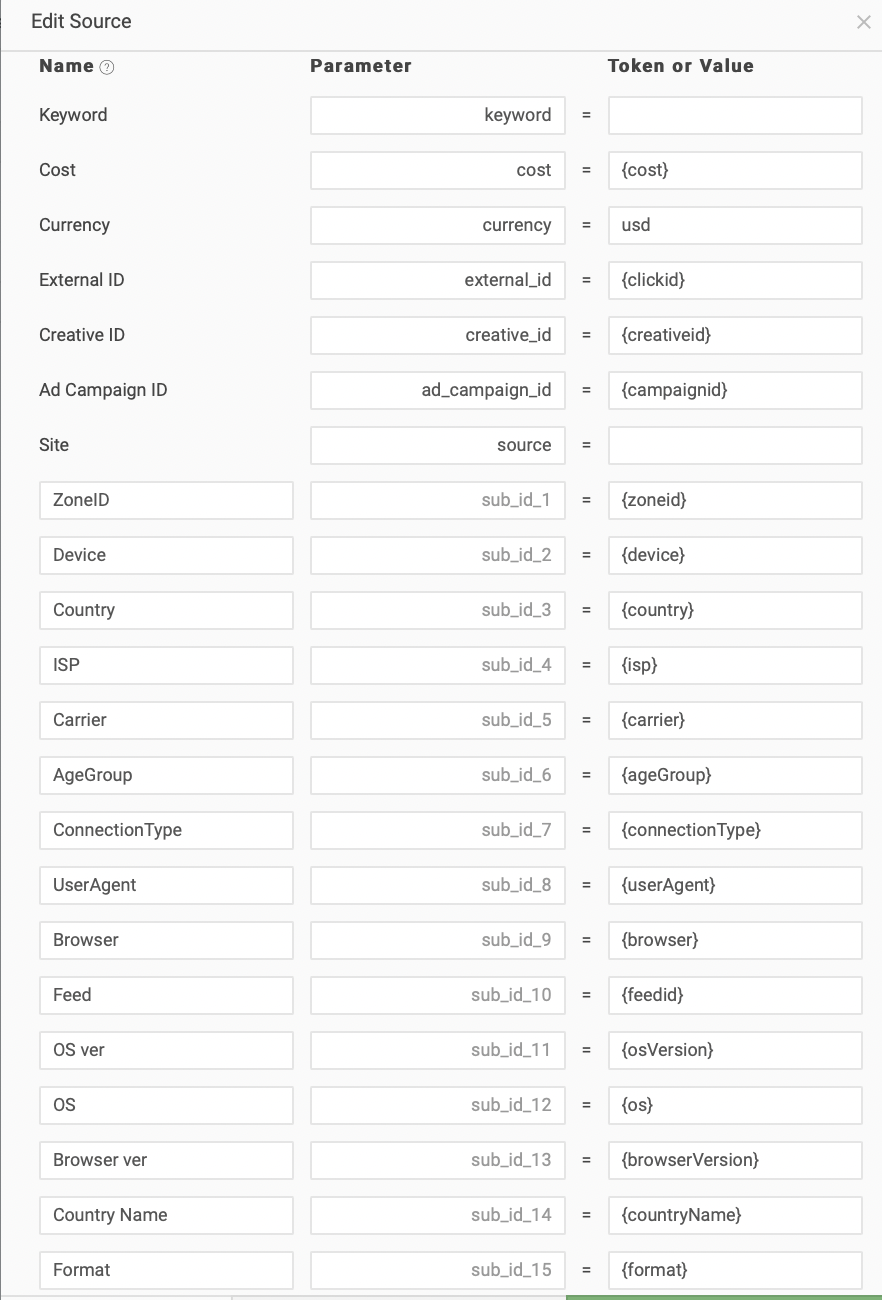
To optimize the campaign, we used the Keitaro tracker: first of all, we set up the traffic source (hit “Add traffic source” on the corresponding tab and created an entity for it) and added the parameters that the network can broadcast.
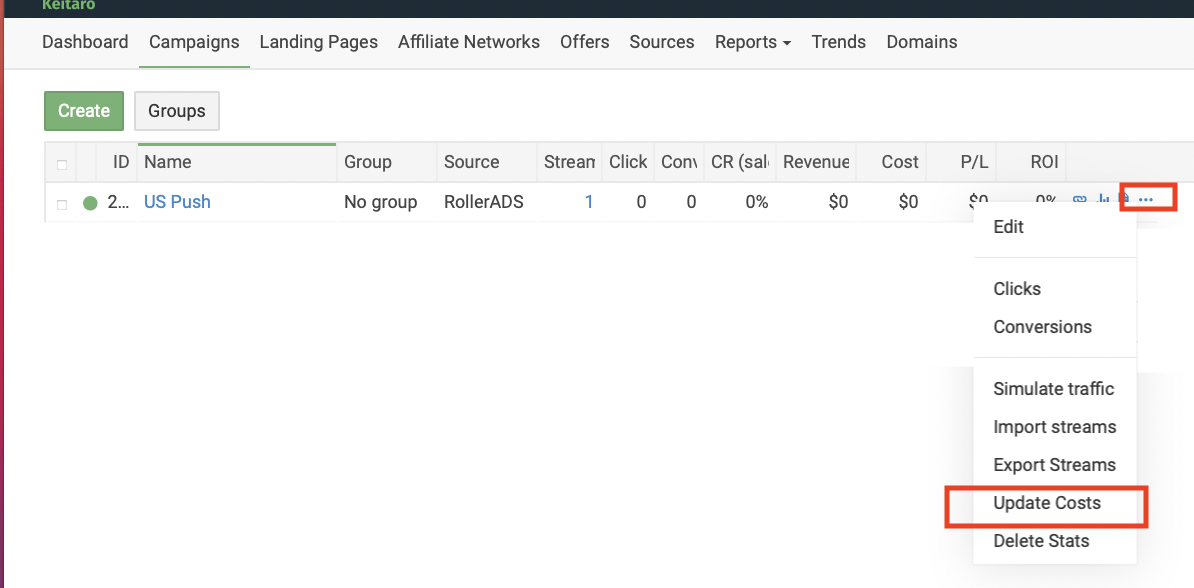
The discrepancy percentage varies between advertising networks. As many networks register either too many or too little clicks, campaign costs in the network won’t always match those in the tracker. So, it makes sense to update the costs post-factum, for example, weekly or monthly.
To update the costs, go to the “Campaigns” tab, find your ad campaign, hit the ellipsis button, choose “Update Costs” and input the necessary sum from the advertising network. You can update the costs by various segments: by creative, by city etc.
Below, you can see the list of parameters to look into when analyzing and optimizing the campaign:
- Costs
- Creative ID
- Ad Campaign ID
- Zones
- Device type
- Country
- Connection type
- Carrier
- Subscription age
- Browser + its version
Campaign settings
Before hitting it off with RollerAds, pick the ad format. In our case, it’s push notifications. To simplify navigation between campaigns, use clear and meaningful names, e.g. “US Push1 0-3”. This title implies that you are targeting US users who have subscribed to receive push notifications 0-3 days ago.
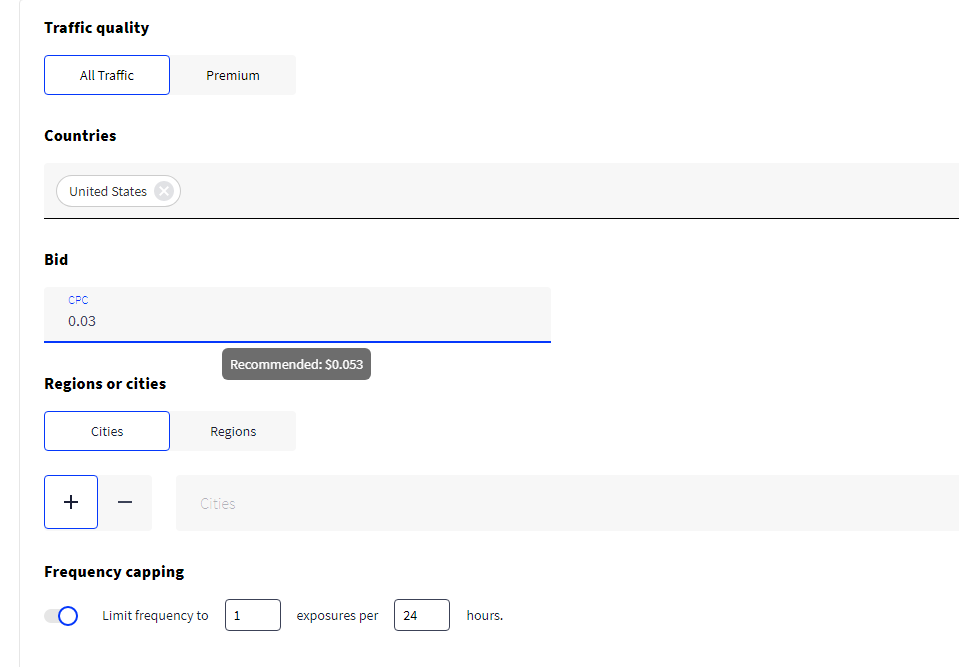
The platform offers two types of traffic: regular (all traffic) and premium. The latter is self-explanatory, which means it’s high-quality traffic that consistently shows great results for all platform users. However, since our task was to test the traffic source, we started with the All traffic option.
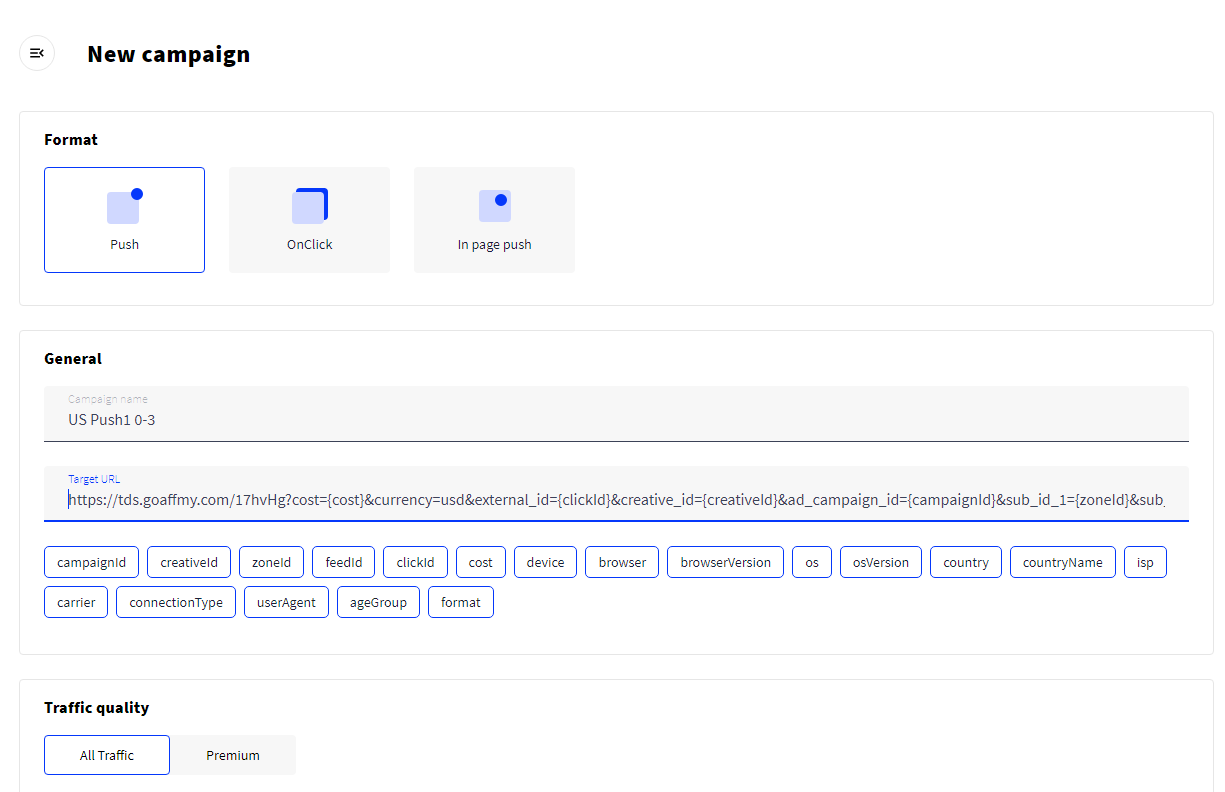
We chose the USA as a country and launched the campaign for all cities and states.
Based on our targeting settings, he system recommended a bid of $0.053.
Take note: quite often, this number is inflated, so since we were just trying things out, we set the bid to $0.03.
We’ve set the frequency capping to 1/24. That means, that each user will see the ad once every 24 hours. This is an optimal frequency for a campaign such as ours as it provides the uniqueness of traffic.
We launched three ad campaigns with three creatives in each of them.
A classic approach to using push notifications in Dating campaigns implies your ads imitate a message from a girl. Such creatives include a picture of a girl and a short text. For testing purposes, we selected several different pictures to see which one would convert best. The first creative had a studio-quality picture of a model-looking girl. The second and the third photo had selfies made from different angles. Here are a few recommendations:
- Use simple text. A nickname in the title and a luring offer in the description do the job.
- Make sure the icon and the picture match, e.g. they both show the same girl (or at least they look alike).
If you have troubles finding high-converting US creatives, ping the network’s manager for assistance.
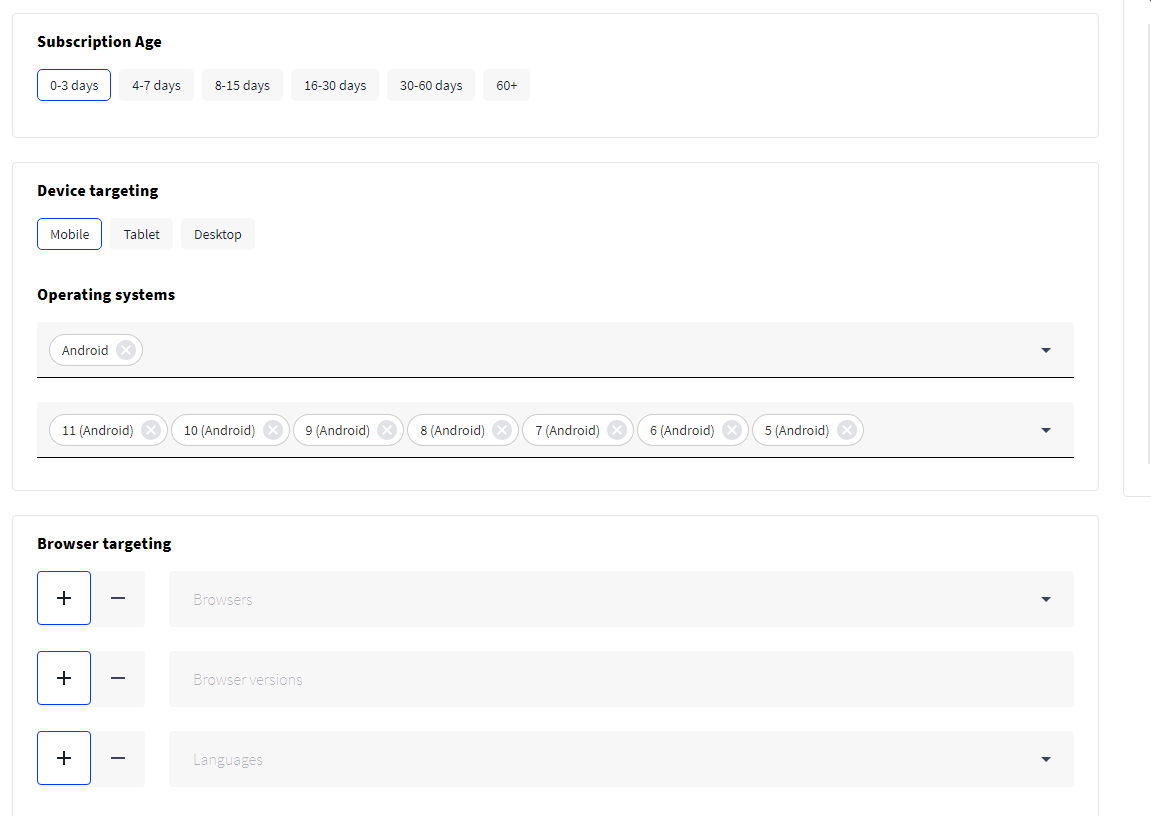
The platform allows you to target users based on the age of their subscription, that is, how long ago they have subscribed to receive push notifications on a given site. Based on our experience, old subscriptions (2 weeks+) convert the worst, so we went on and created three campaigns to target users who had subscribed 0-3 days, 4-7 days and 8-15 days ago.
As for other targetings, we chose Mobile users and Android device owners.
Take note: don’t target devices with the Android version 5 and lower — such users usually carry older devices that might not work well for your campaign.
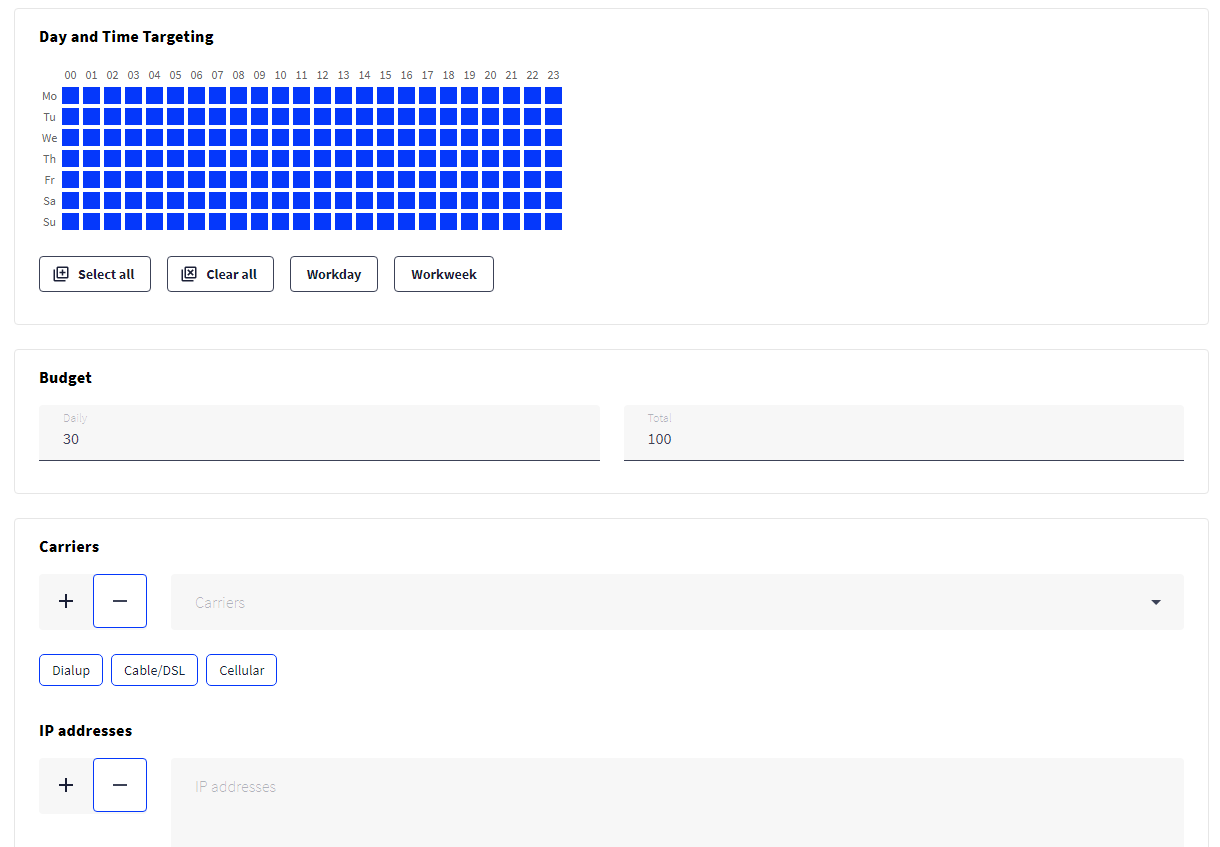
The campaign should work 24/7. If the tests show that the campaign converts exceptionally well during a certain period of day, we will target it separately.
We were ready to spend $10 to test each creative. As there are 3 creatives per campaign, the campaign’s daily budget would be $30. And the overall campaign limit was set to $100 to help us stay within the budget.
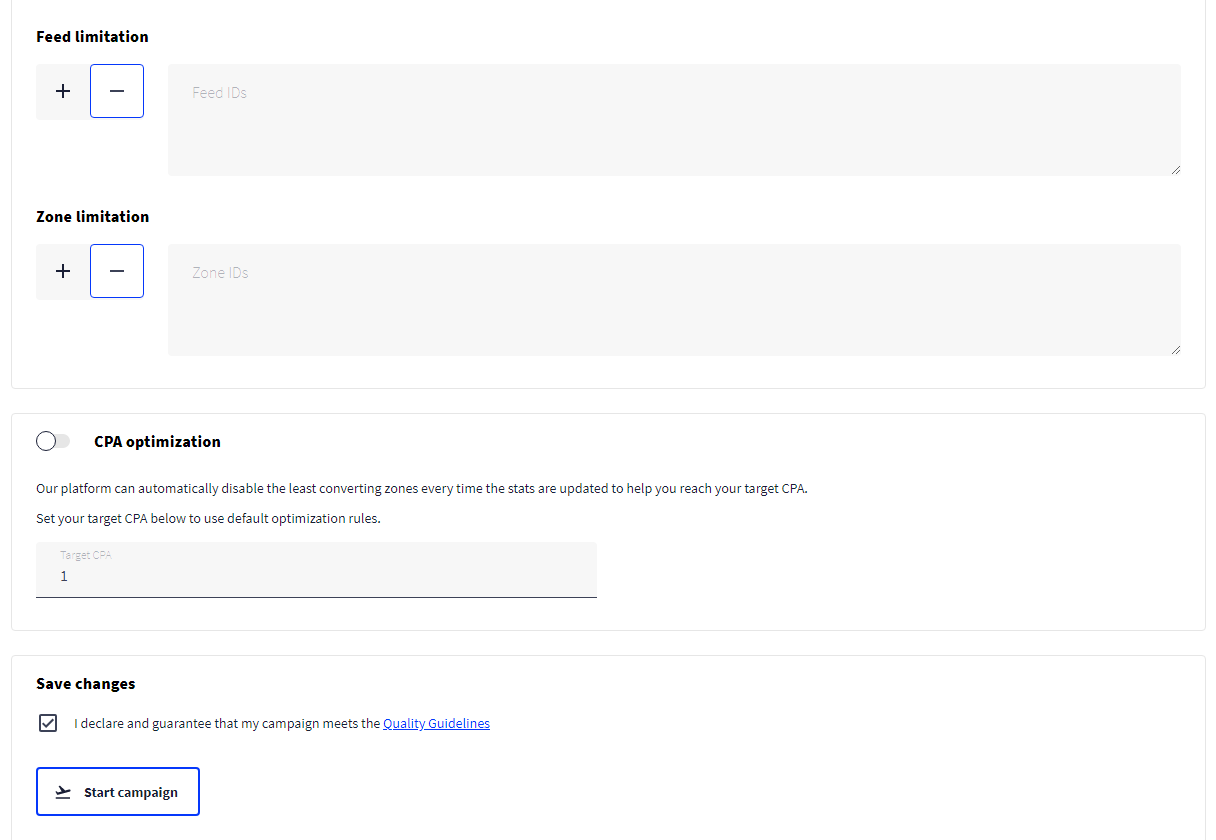
An interesting point: RollerAds has a handy feature: it can automatically optimize your campaign based on CPA. In a nutshell, it blacklists the zones that haven’t brought any conversions after receiving a certain amount of traffic, and the ones that used to bring conversions but don’t anymore.
Our recommendation is to consult your manager before using this feature.
The first round of analysis and optimization
We decided to look at the stats in about 24 hours after launching the campaign. Our total costs equalled $40 with 15,03%.
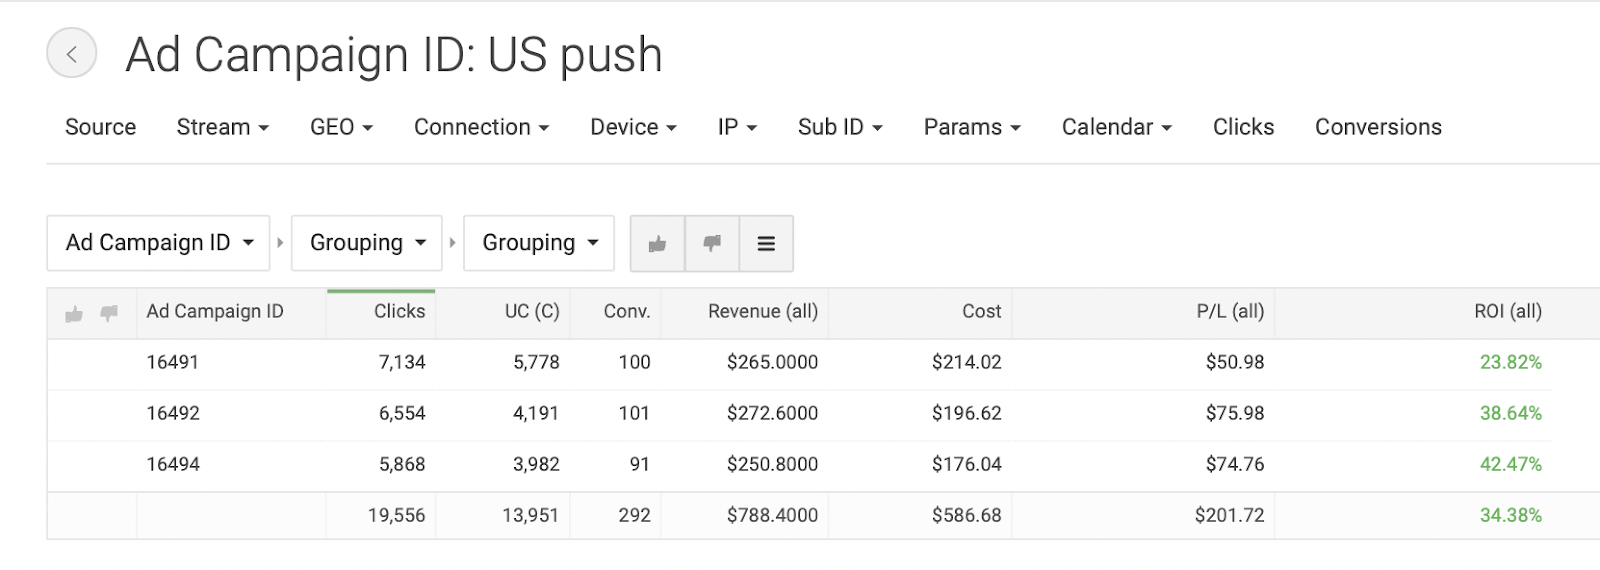
16491 — the campaign targeting users with the subscription age from 8 to 15 days
16492 — the campaign with the subscription age of 4-7 days
16494 — the campaign with 0-3 days after subscription
The initial analysis revealed that the campaign was relatively efficient. The best results, predictably, came from the campaign with the freshest users (0-3 days).

MapMyMilf had the highest ROI among all campaigns. However, we were not ready to stop other campaigns as they still required more traffic to unfold. Also, it’s vital to remember that with Push notifications, the situation can differ drastically in a few days after the campaign has been launched and ROI can have a significant increase. Users often open push notifications with a delay, that is, in a few days after subscribing to receive them. The optimal timeframe to estimating the click overflow is between one to three weeks. Even if your campaign has been already stopped, you can still receive clicks. This is called “click overflow”. The optimal time to estimate clicks overflow is about 2 weeks.
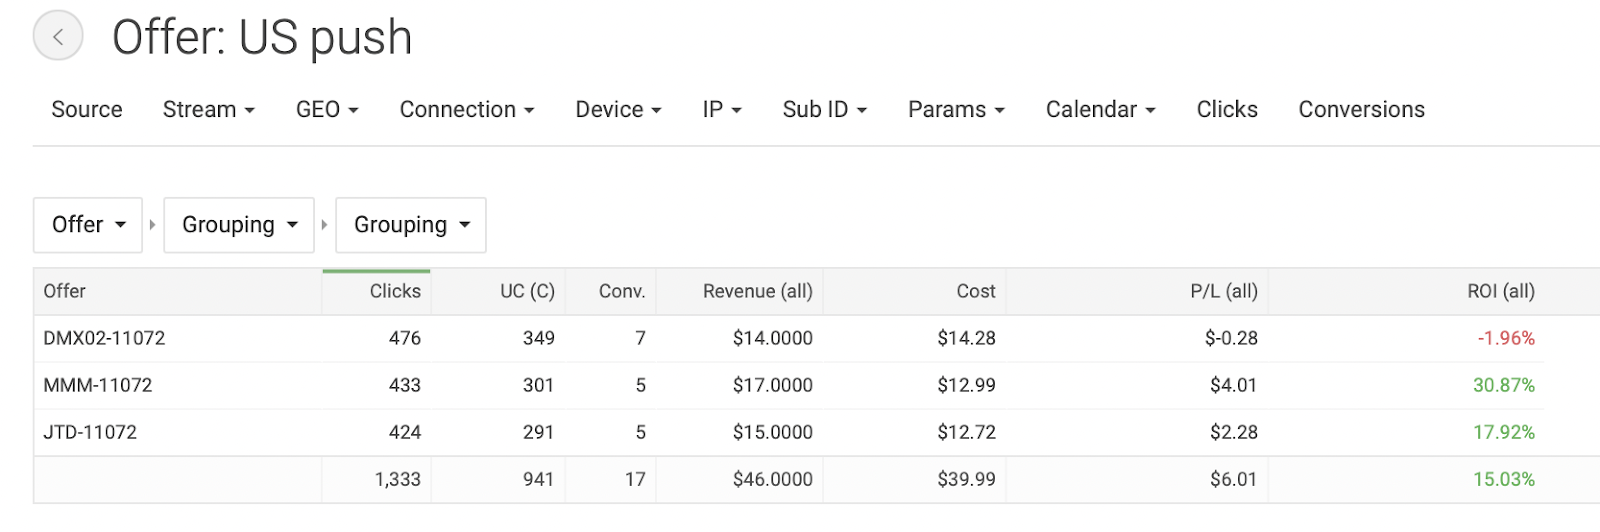
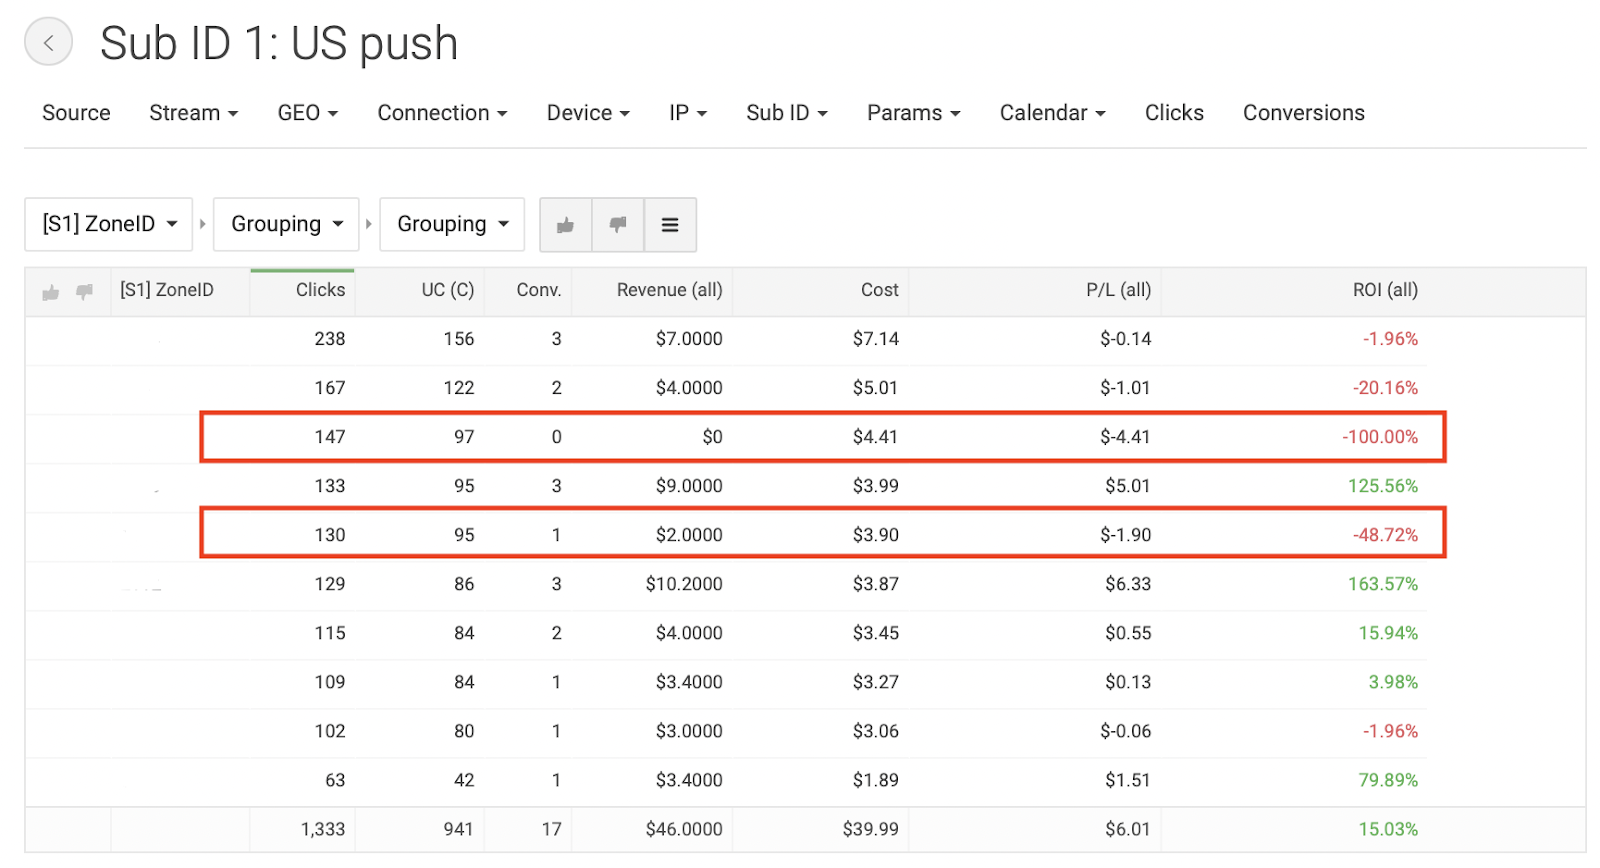
First of all, we optimized the campaign by traffic source (Zones) and excluded 2 zones from the list of 10 (those two had negative ROI). We decided not to do anything with other campaigns as we still didn’t have enough data at hand.
While you don’t have much traffic volume, it makes sense to remove traffic sources that have ROI < -40%. With ROI as low as this it’s highly unlikely that these zones will convert in the future, even considering the conversion overflow.
When the campaigns got more traffic, we started removing the zones with negative ROI.
After looking into the statistics, we didn’t see any drastic differences between the campaigns. There was still no point to optimize them — to come to solid conclusions we still needed more traffic. None of the campaigns was able to reach its daily limit which means there was no sense to limit the traffic. However, we left the overall budget as it was — we suspected that the campaigns wouldn’t use it anyway.
The second round of analysis and optimization
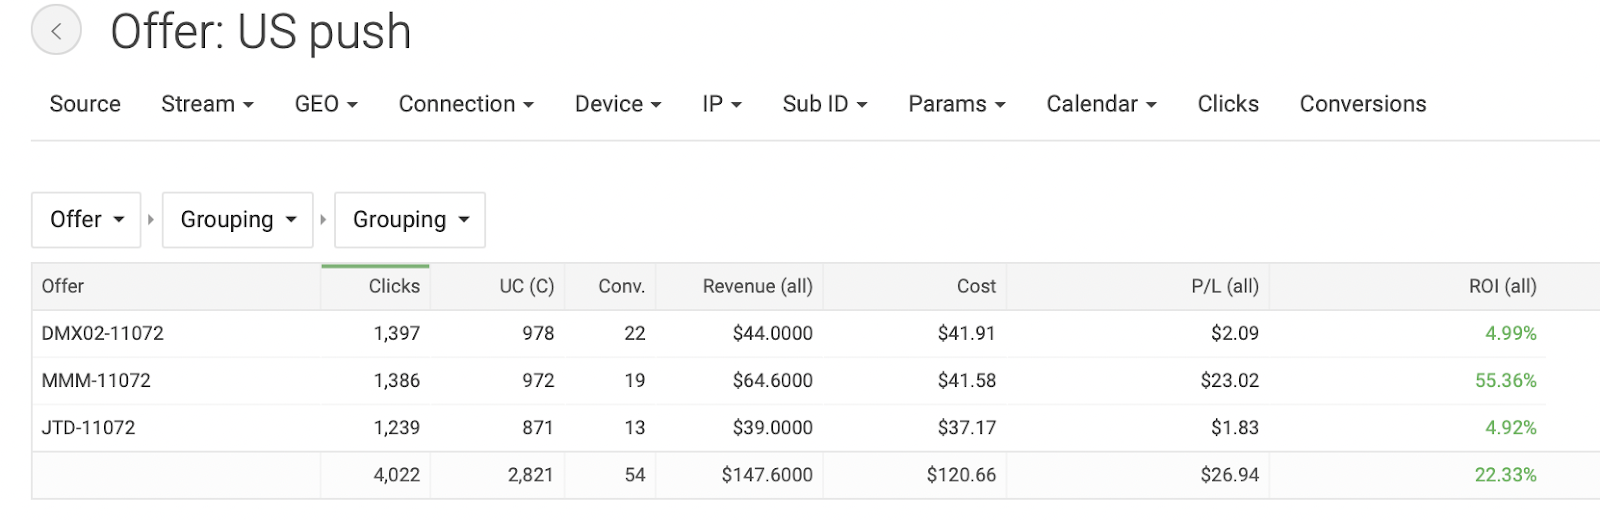
In three days after launching the ad campaign, we ran the second round of revision.
The situation didn’t change much: 16492 (4-7 days) had the lowest ROI, and the campaign with the freshest users (0-3 days) was still showing the best performance.
As we’ve mentioned before, push campaigns often feature the “overflow” factor, so the campaign stats can improve over time. We were hoping for it, so we decided not to stop the campaigns just yet.

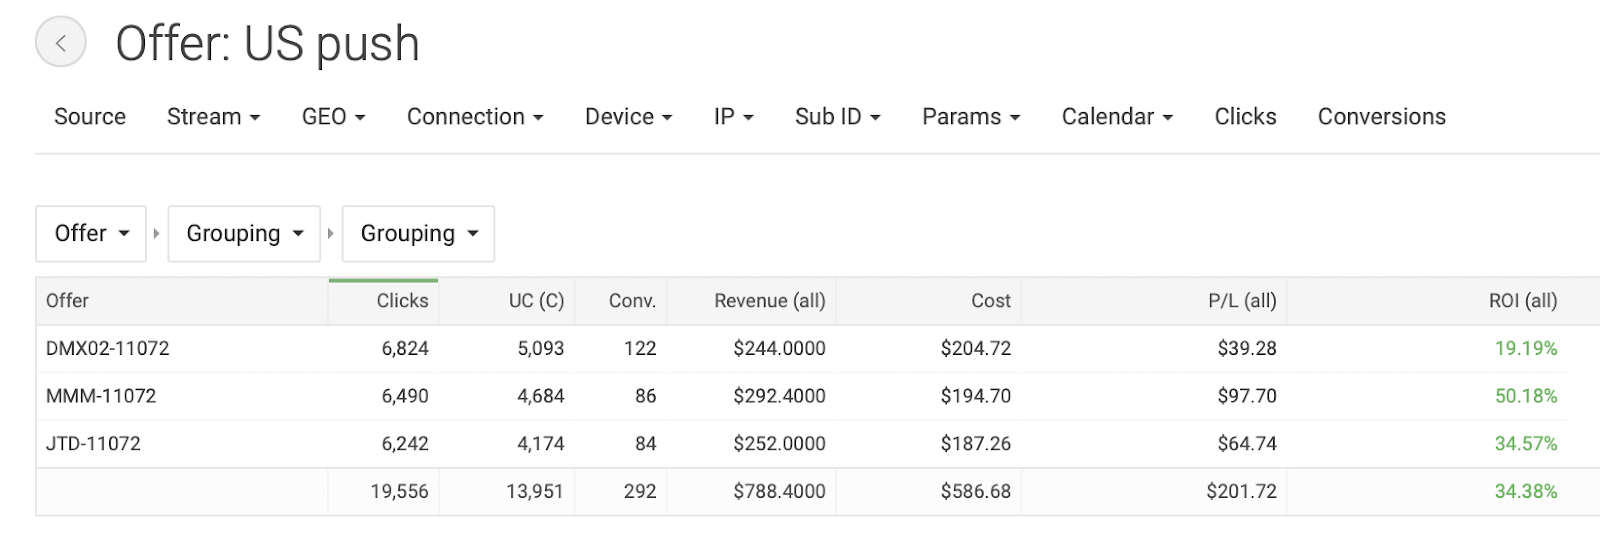
We’ve collected the statistics to know for sure, which of the offers converted best. According to it, the obvious leader was MapMyMilf (ROI 55,36%).
We also recommend taking a look at the offer which closely follows the leader. You can use it as your plan B if the winning offer stops converting or the advertiser has technical issues on their side. At this point, the other two offers demonstrated similar results, so we decided to drive a little bit more traffic to them to determine the runner-up.
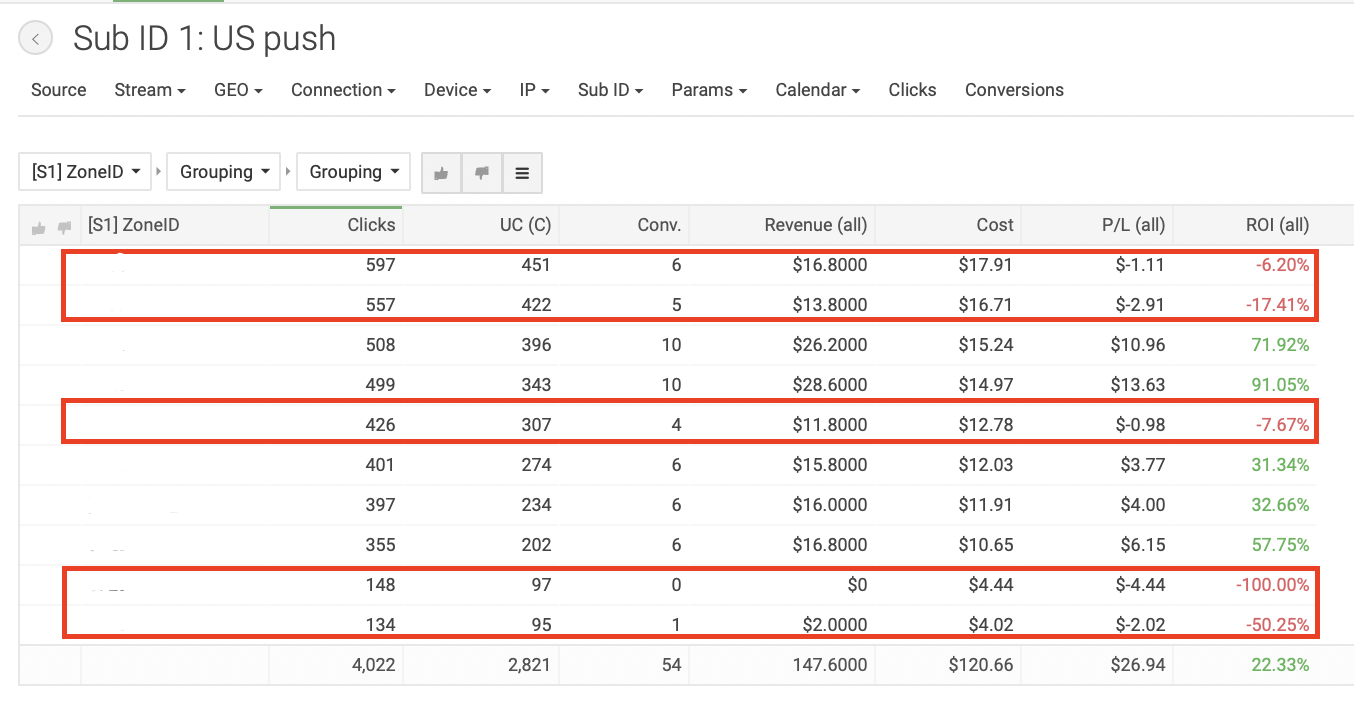
As you can see from the screenshot, we found 5 traffic sources with positive ROI. Prior to that, we blacklisted all zones with negative ROI, so the rest of the testing will be executed on these fine zones and the new ones, should we get any.
If you don’t use whitelists, you will see new zones in the campaign as it runs. Watch it closely up until they get enough traffic — then you will be able to estimate their quality. And don’t disregard the basic A/B testing rules: never compare traffic sources with 10 and 1000 clicks respectively gathered during different periods of time.
We planned to keep the campaigns running for 10 days in total. As you remember, we’ve set the overall campaign limit to $100. At the time of the last optimization round, the campaigns spent 50% from that sum. Thus, we increased the overall budget to $300: we were satisfied with traffic quality and were ready to buy more.
Third round of optimization
After 10 days, we were ready to strike a balance. In two weeks, we got the following results:
Clicks: 19556
Conversions: 292
Costs: $586.68
Revenue: $788.4
Profit: $201.72
ROI: 34,38%
Campaign statistics ended up to be more leveled: there were no significant spurs in ROI. However, the campaign with subscription age of 0-3 days delivered the best results with the ROI of 42,47%.
Here are the overall ROI stats by offer:
DateMinx — 19,19%.
JoinTheDating — 34,57%.
MapMyMilf — 50,18%.
As you can see, the hierarchy became more apparent as the ROI grew for each campaign. This happened due to the “overflow” factor and our optimization efforts.
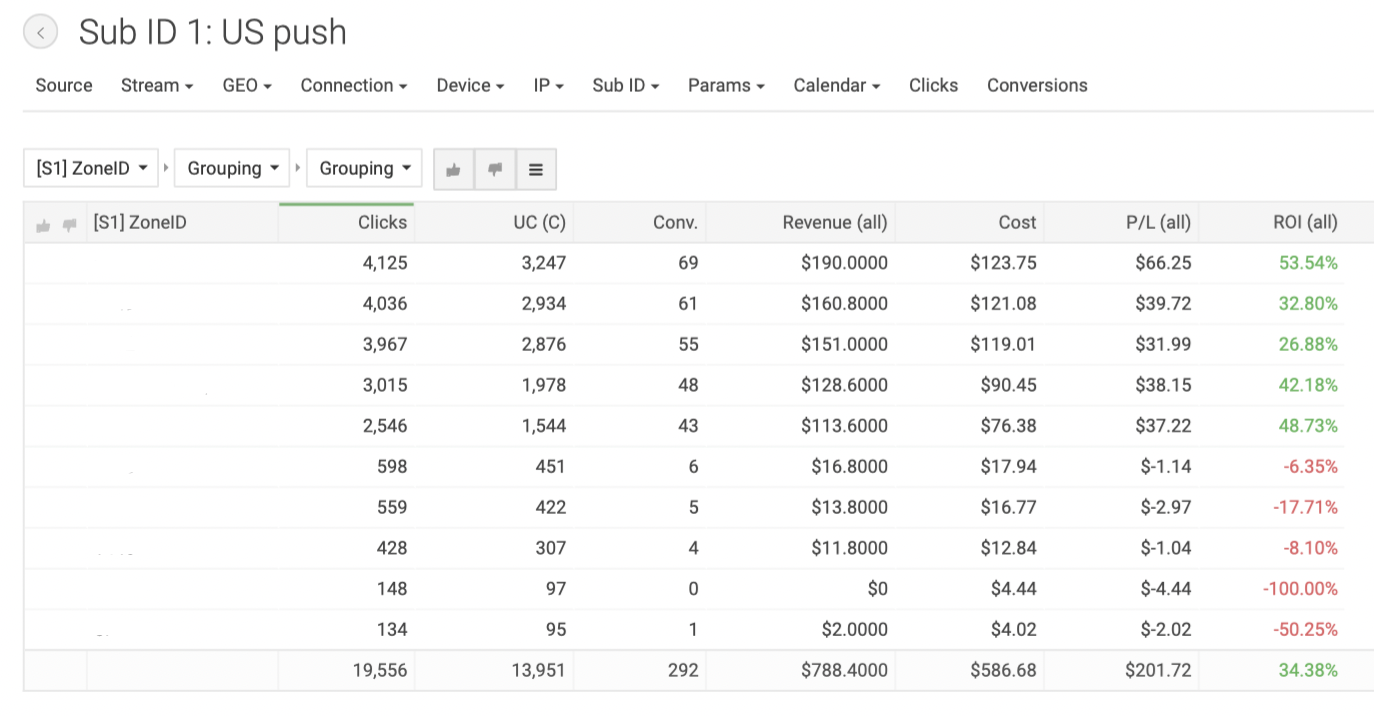
No new zones appeared in the campaign, and the 5 that were left all performed well:
Highest ROI — 53,54%.
Lowest ROI — 26,88%.
Pro tip: try creating a separate campaign for each zone and play with the bids.
We laucnhed three ad campaigns with three similar creatives in each of them. Summing up our experiment, we’ve created a table with stats by creative:

All creatives performed well, yet the second one turned out to be an obvious leader with ROI of 63,03% and CR of 1,79%. This creative featured natural selfies, so as you can see, this type of creatives converts best for push notifications.
Tips and recommendations
After thoroughly analyzing the results of our experiment, we’ve put up a list of basic recommendations for anyone who’d like to work with push ads in Dating:
- For push notifications, the best subscription age group is 0-3 days. Try increasing the bid for this targeting segment and closely monitor the amount of traffic and your ROI.
- To know which offer converts best, test pictures of different styles: studio, home-made, selfies etc.
- Even though we gave a chance to each offer to unfold and demonstrate its potential, the offer that consistently showed the best results was MapMyMilf. However, keep in mind that you should always have a plan B offer in case something goes wrong with the first one.
- For efficient optimization, you can create separate campaigns for each of the highly converting zones. This way you will be able to correct the bid based on the zone performance.
- Don’t forget about the Premium traffic option. Even though we didn’t test this time, it makes sense to do it and check if it actually performs better.
- Always use the tracker: it will help you analyze the statistics and target the ad campaign by various segments for increased profits.
- Split-test your offers to know which one has the highest ROI and conversion rate.
- Experiment: test different GEOs and you will most definitely find the ones that will bring you the maximum profit.
And wrapping it up — here’s a nice bonus for our devoted readers!
When registering at RollerAds use the promo code “RollerAffmy21” and get a 10% bonus on your first deposit (only for new advertisers).
When registering at Affmy use the code «RollerAds» and get a 10% bonus to your first payout from $1000 in case you run the Affmy in-house offers up until 31.07.2021!
And if you are already registered at Affmy, but haven’t tested our exclusive offers with the highest payout rates on the market, it’s about time to do it! With the promo code «AffmyExclusives» you’ll get a 10% to your first payout for $1000+ if your campaigns run up until 31.07.2021.
Your personal manager is already expecting a call from you! Go hit them up and start driving traffic!
Have a great CR!