Imagine your pre-landers doing double duty—not only driving conversions but also generating extra revenue. And that’s without any additional effort on your part. We say it’s possible! Moreover, hundreds of affiliates already earn at least 10% extra on top of their ongoing campaigns. Thus, they lower traffic costs (as long as they acquire high-quality traffic).
In this case study, we’ll dive into the ins and outs of additional monetization opportunities. Specifically, we’ll use our split test to highlight how much you can earn with push subscriptions and the back-button functionality in just a week! Let’s roll.
Having trouble creating pre-landers? Check out our article to get equipped with the right tools and tips.
Push Subscriptions as an Extra Profit Tool
Your pre-landers serve several purposes: warming up your users before they complete the targeted action, overcoming common user objections, and conveying additional information that doesn’t fit within the creative—all in all, they funnel traffic for direct conversions. By enabling push subscriptions, you can generate extra income from the same user base and boost your campaign ROI and LTV. Plus, you get a chance to re-engage subscribers repeatedly with new push notifications.
Note that you can monetize your pre-landers on RollerAds even when working with other ad networks. Our push notifications can synergize with your main campaign flow!
How Push Subscriptions Work
Just as publishers incorporate push notifications into their websites, you can do the same and watch your additional earnings grow. All you need to do is sign up for the RollerAds network as a publisher, add a special line of code to your landing page, and start building a database of subscribers. Once this setup is complete, the service will begin sending push notifications to your subscribers.
Note that you need access to the site’s root folder and the pre-lander code.
Push notifications function like a snowball—the more your landing gains traction, the more subscriptions you acquire. While your database may be small at first, it can grow into an avalanche over time. The number of subscribers you have will ultimately determine your income.
Want to know more about push notification opportunities? We’ve prepared the complete guide for you.
Adding the push subscription tag takes minutes, and our managers are always ready to help integrate the HTML code into your pre-lander.
For your convenience, we’ve created a step-by-step guide on setting up a publisher account and installing a push subscription tag into your pre-lander. Let’s walk through the process together.
Push Subscription Set-Up Guide
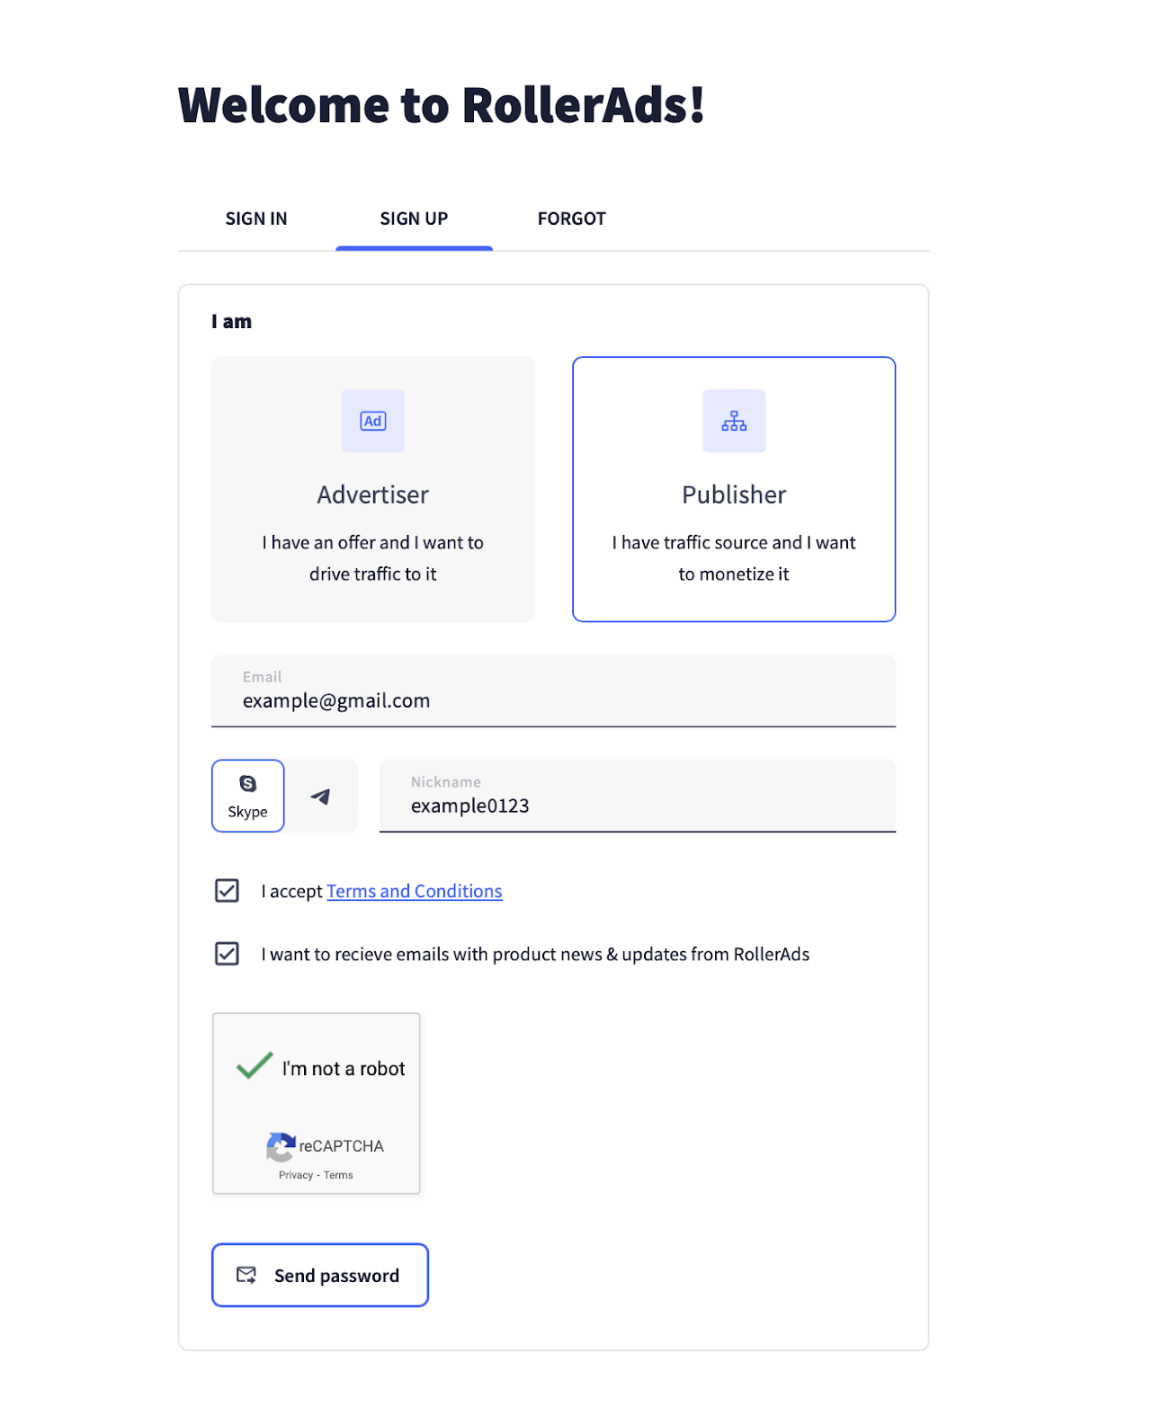
1. Go to the Sign-up form and register as a publisher. Make sure your advertiser and publisher account emails are different. After registration, you can add your pre-lander yourself or contact your manager for assistance.
2. Add your website.


3. Your domain gets a unique serial number (e.g., ID 1299206). To activate it, complete the verification process by downloading the verification file and placing it in the root folder of your domain. Once added, click the “Verify” button.

Once the system verifies your domain, its status will change to “Active.”

4. Select a Push placement to create a push subscription code and get a serial number (e.g., ID 1448242).


5. After creating the Push placement, you’ll receive instructions to install the push subscription code on your pre-lander:
- Download the service worker file to integrate the code.
- Upload the service worker to the root folder of your domain.
- Click the “Check service worker” button.
- Paste the push subscription code into your pre-lander script.
- Upload the updated script to your site’s root folder.
- Save and refresh the server for the updates to take effect.

That’s it! The push subscription code is now integrated into your pre-lander.
Case Study: Split Test on Push Subscription Earnings
In order to explain why you should put the Push subscription code to your HTML, we’d like to share a case study with you. Specifcially, it’s a split-test: with and without push subscriptions enabled on the prelander.
For the test, we selected the following CpaRoll offers and launched them within a single campaign:
US—CashApp—CPL (id 2200) CPA $3.5
US—Cash App Gift Card—SOI (id 2293) CPA $3.2
US—CashApp—CPL (id 2198) CPA $3.5
Launching a campaign with several offers within a test is a common practice. This helps you easily compare their performance and identify which one works better or worse. Plus, you can disable an underperforming offer at any time without losing traffic or interrupting the campaign.
All offers had similar targeting requirements.
Vertical: SOI Sweepstakes
Geo: United States
Device Type: Mobile
OS: Android
The campaigns were launched with the following settings.
Format: Push
Bid model: SmartCPC

Then we selected a country suitable for the offer and set the Bidding strategy slider to the bid above average.

Don’t forget to set a daily and total budget (it’s optional). In our case, we set a $20 daily budget and $100 for the entire campaign.
Set the subscription age to a minimum of 0–3 days.
We also requested a whitelist of feeds from our manager and applied it to the campaigns (you can do the same—just reach out to your account manager). Finally, we adjusted targeting for the desired device and OS.

We saved changes and sent our campaigns to moderation.

Once moderation was complete, it was time to optimize our campaigns. But before doing that, we decided to add an extra feature that would synergize with the potential monetization, i.e., the back button script. Let’s dive into the details!
Back Button Script Explained
The Back Button script is a piece of code embedded in the pre-lander that tracks user actions—such as pressing the back button or attempting to close a tab—and redirects them to another page. This helps retain traffic and increases monetization opportunities.
If a user tries to exit the pre-lander, you can adjust the script to redirect them to another page where they continue engaging with your content.
This allows you to seamlessly direct users to another link within your campaign at no additional cost.

When to Use the Back Button Script
- Boost campaign ROI by keeping users engaged.
- Reduce losses if your main offer isn’t performing well.
- Test different offers on users leaving your site.
Tip: Albeit efficient by default, this method can harm user experience if overused due to intrusiveness.
In our case study, we implemented the Back Button script to measure its impact and see the profit it might bring. It was specifically used in the pre-landers of the campaign together with a push subscription tag and remained active throughout the entire test period.
How to Add the Back Button Script
1. Request the back button script from your manager.
2. Create a separate campaign in your tracker and add an offer.
3. Add the tracking link to the script.
4. Incorporate the script into the pre-lander code.
Now, it’s time to optimize our campaigns.
Optimizing Both Campaigns
We applied similar optimizations to both campaign variations.
Day 1
After the campaigns started receiving traffic, we monitored and optimized them by Zone ID, blacklisting zones with a 0% LP CTR (Landing Page Click-Through Rate).


Day 2
On day 2, we continued Zone ID optimization, but this time over a 2-day period. We blocked zones with a low LP CTR and those that failed to generate conversions after a sufficient number of clicks.


We reviewed the pre-landers and offers and paused the ones that were underperforming. Initially, both campaigns had two rotating pre-landers, which had similar LP CTR results but varied in ROI and profit by the second day of traffic flow. As a result, we paused the pre-landers that weren’t performing well, while the others remained as is.


Day 3
The push-tag-based campaign had an offer that was underperforming, so we disabled it.

As for the campaign without the push tag, all the offers worked decently there.

We continued optimizing zones with low LP CTR and those that failed to generate conversions after a sufficient number of clicks in both campaigns.


Creatives were optimized as well, so we turned off the underperforming ones.

In the campaign without the push tag, it was too early to disable underperforming creatives because some of them hadn’t acquired enough traffic to make such a decision.

Day 4
Nothing out of ordinary, we were optimizing creatives this day to figure out the top performers and focus on them.


Day 5
Both campaigns were paused to prevent our team member involved in testing from going nuts. Ads are everything, but even affiliates need their beauty sleep.
Day 6
We got back to optimizing zones in both campaign variations: we turned off zones with a good number of clicks and a proper LP CTR but without conversions, as well as those with low LP CTR.


Day 7: Summarizing the Results
On the final day, we focused solely on optimizing the campaigns by zone.
After running the campaigns for six days, we got the following results.

The campaign with a push tag showed 48.99% ROI, generating a profit of $51.62. The average CPC was $0.126, and the average CR was 6.12%.
The campaign without a push tag delivered 50.13% ROI and generated a profit of $49.82. The average CPC was $0.128, and the average CR was 6.08%.
Our testings suggest that the push subscription code didn’t impact the campaigns’ performance. Also, LP CTR remained almost identical for both campaigns, around 46-47%.
Now, let’s see how much we earned on this push subscription code.

The result is clear: $4.55 in total—9% from the total profit. Push subscriptions help to boost your revenue and are cumulative, meaning the more you invest in such a campaign, the bigger the payoff will be. By ignoring the monetization of prelanders, you’re basically suffering a 10% opportunity cost. And all that’s needed is a couple of extra lines in your HTML to unlock that boost!
A cool side effect of collecting one’s database of push subscribers is that it brings money even after stopping the main campaign. See the screenshot below:

In total, the push subscription tag brought in $5.93, accounting for +11% of the total profit.
Let’s not forget that we also had an active back button in this campaign. It “caught” users as they attempted to leave the pre-lander, giving us an extra chance to redirect them to the offer page.

Thanks to this additional monetization method, we earned $19.20 without any extra costs. This contributed 37% to the total profit of this push-tag campaign.
Let’s compare the final campaign results with and without additional monetization (push tag + back button).
Сampaign without the push tag and back button:

Revenue: $149.20
Cost: $99.38
Profit: $49.82
Сampaign with the push tag and back button:

Revenue: $157.00 + push tag $5.93 + back button $19.20 = $182.13
Cost: $105.38
Total profit: $51.62 + push tag $5.93 + back button $19.20 = $76.75
By using additional monetization methods, we earned $48% more than we would have without them.
The Takeaway
1. The push subscription code had no impact on the campaigns’ performance. The LP CTR remained nearly identical for both campaigns, at around 46-47%.
2. Push subscriptions keep generating revenue even after the campaign concludes.
3. The push subscription code contributed an additional 11% to the total profit, while the back button functionality boosted the total profit by 37%.
4. All in all, by using both monetization methods, we increased our total profit by 48%.
Two lines of code can increase the efficiency of your already existing funnel by a whooping 48%, at least when working with RollerAds. The question is, will you let this opportunity slip or take advantage of it and squeeze the most out of your campaigns? With RollerAds, you can work smart, not hard.
Now, you’re fully equipped to launch your pre-landers for dual profits. If there are topics we haven’t covered in this article, you’ll find a wealth of useful guides in our Help Center. Feel free to reach out to our support team with any questions. Happy earning!