Welcome to RollerAds, the full-cycle ad network!
If you’ve already used RollerAds’ previous dashboard as an advertiser, the current version should be easy to understand. It contains all the campaigns, stats, and balance from the older version, so everything’s in-tact. The only thing that’s changed is design and the introduction of hints.
Our interface is deliberately succinct: no useless tabs or complicated navigation. The platform is equally convenient on desktop, tablet, and mobile—monitor stats and optimize your campaigns literally on the fly.
In a few minutes, you’ll learn how to:
- Add funds to your balance;
- Create a campaign;
- Set up postbacks to track conversions and access smart bidding models;
- Read the stats and scale up your successful approaches.
Quick navigation: Dashboard
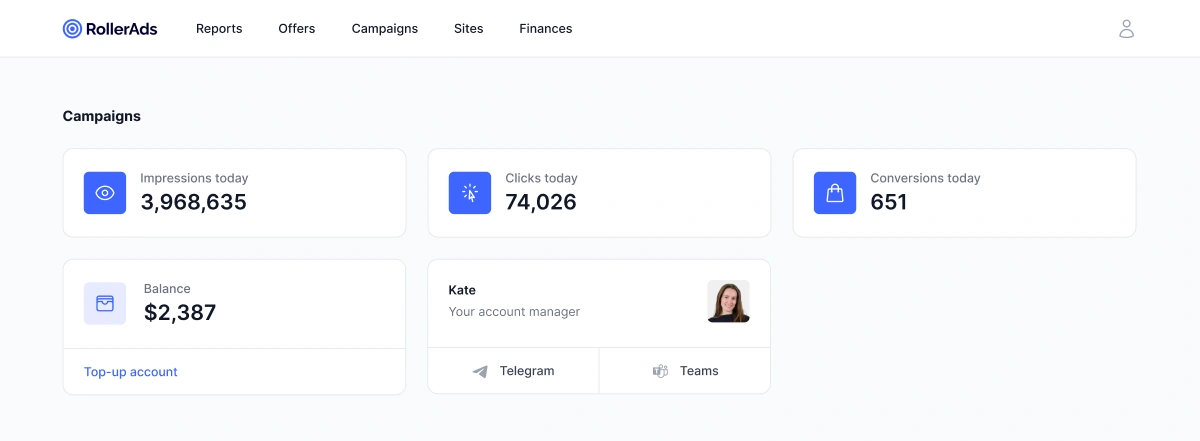
Once you log in, the first thing you see is Dashboard, containing:
- Impressions, clicks, and daily conversion—all updated in real time.
- Account balance—current funds available. From here, you can access another page where you can top up your account.
- Manager’s contact—for instant communication via Telegram or Teams.
If you don’t have an account manager assigned yet, look for the support widget in the bottom-left corner and ask your questions there 24/7.
This page also links to another page where you can quickly set up a campaign; more on that later.
From the menu located in the upper header, you can visit:
- Reports—in-depth statistics on all the offers available.
- Campaigns—a section with active campaigns and all the necessary tools for work (more on that later).
- Offers and Sites—you’ll find information below.
Campaigns: Everything you need for work
This section will help you get acquainted with everything you need to launch campaigns with RollerAds.
Campaign creation page
The campaign creation page is succinct and intuitive, guiding you through every step necessary. Just in case, there are tips on the left of every informational block, or you can always contact us for help.
Without further ado, let’s start your new campaign!
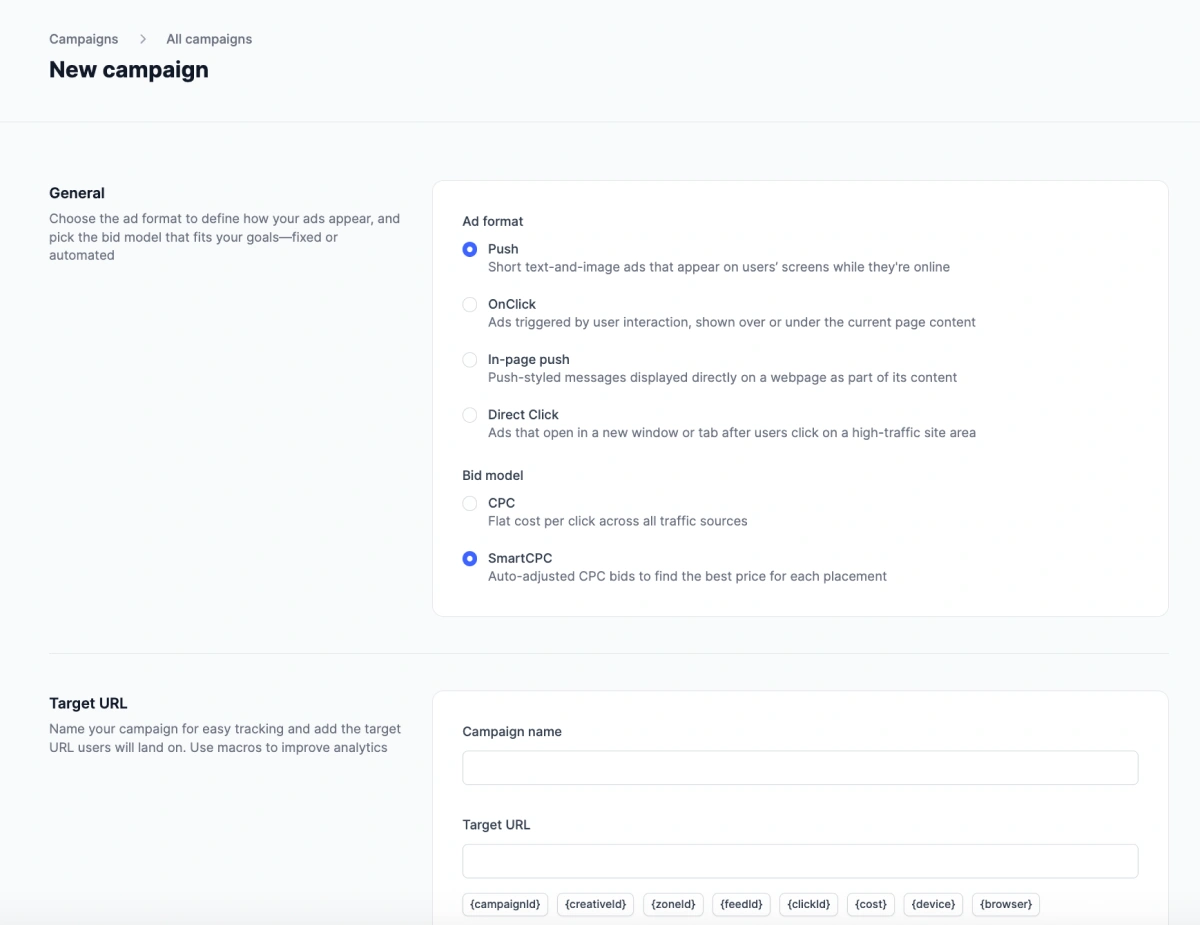
Step 1: General
Enter the main campaign settings, including the name for quick searching in stats, the Target URL where traffic will be sent to, the ad format, and the bidding model. Currently, we have four ad formats to choose from (Push, In-Page, OnClick, and Direct Click), each with unique advantages. Pick the one you like the most and that best fits your offer, budget, and strategy.
Your bidding model will also depend on your goals, but we recommend starting with SmartCPC, SmartCPM, and CPA Goal. Delegate bid optimization to our advanced models for more speed and efficiency when testing our traffic.
Step 2: Creatives (only for Push and In-Page)
If your ad format of choice is either Push or In-Page Push notifications, you need to upload creatives, which will be displayed to your users at this stage. You can have up to 10 creatives, and we recommend adding as many as possible to new campaigns. This will help you figure out which one performs best and allocate your budget accordingly.
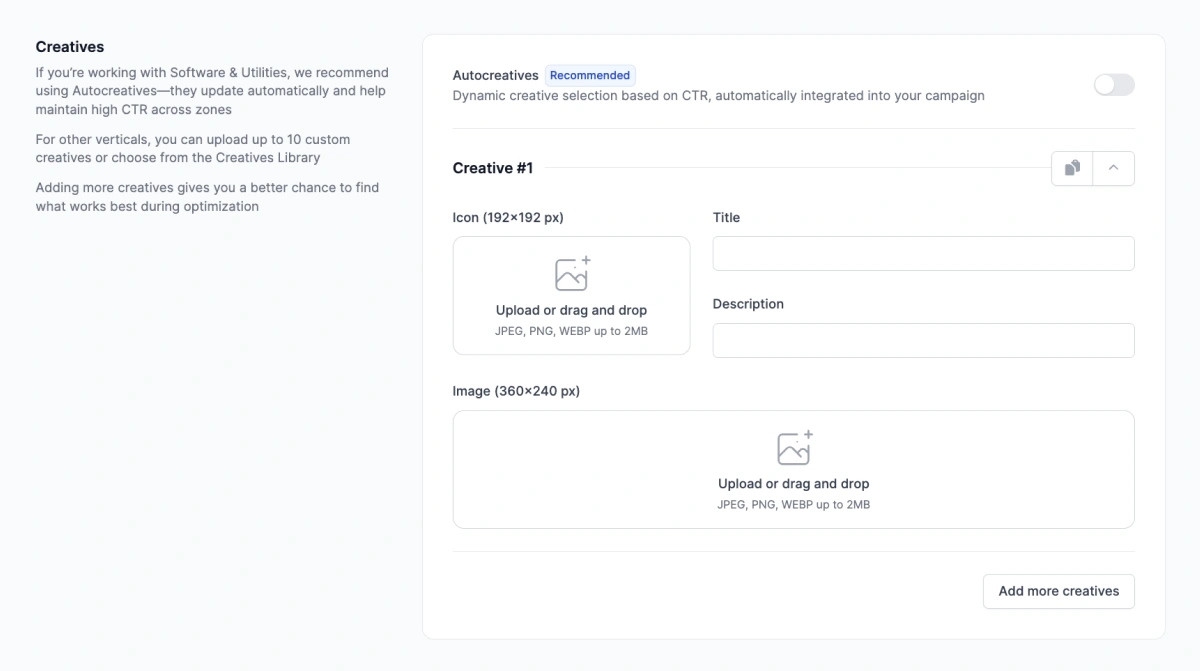
On top of that, we have two handy solutions that can ease your work with creatives:
- Creatives Library is our in-house spy tool. It contains top-performing creatives that you can use as a source of inspiration or for market analysis.
- Auto-creatives for Software & Utilities. It’s an automatically updated set of creatives made with advanced generation techniques. The system takes CTR into account when generating new creatives and replacing the old ones.
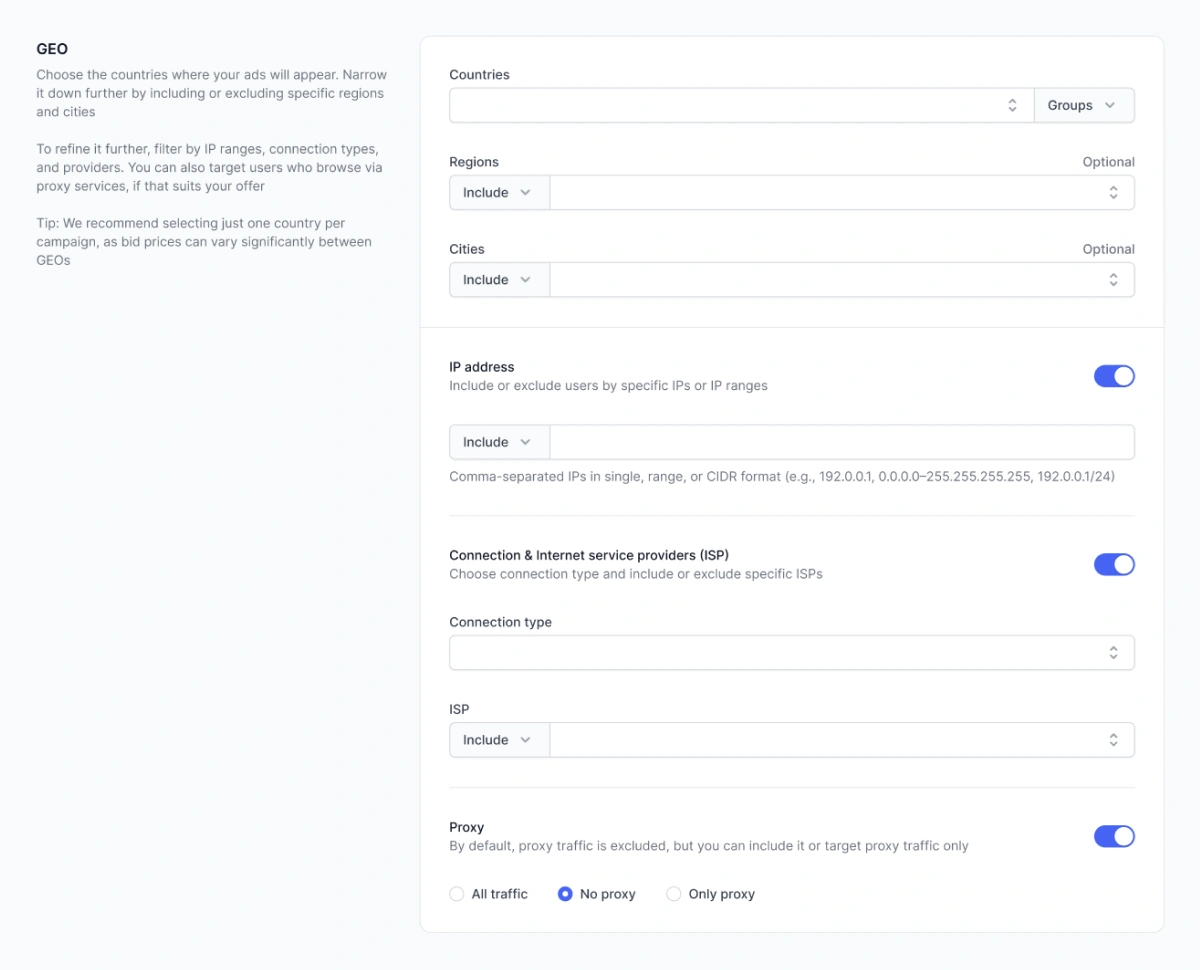
Step 3: Targeting options
An important step, when you decide which users will see your ads. Selecting a country and a device is always required; the rest is optional.
Generally, we recommend specifying the device and OS. Other settings can be adjusted if your offer has extra limitations or when you want to optimize things even further. Remember, narrow targeting means less traffic, so you have to find the perfect balance between wasting all your budget on irrelevant users and skipping some promising leads.
Step 4: Bid & budget
At this stage, you need to set up bids: fixed rates for CPC and CPM or upper thresholds for SmartCPC and SmartCPM. All the models support custom bidding for whitelisted zones if you feel like it.
If you launch a CPC/CPM campaign, our Traffic Estimator will show how much traffic you can get approximately, based on your settings. Don’t forget to check out our Rates page, where we update the information on average bid amount for various GEOs and ad formats.
Here, you can also limit your daily and total budget to prevent overspending.

Step 5: Review & launch
Last but not least, you must review and launch your campaign. You can save it as a draft and come back to it later or launch it immediately. After clicking “Create campaign,” it will undergo quick moderation to ensure full compliance with our guidelines. The campaign will be launched automatically if no violations are detected and enough funds are available. Your first impressions will be displayed in statistics.
Common reasons for rejection: adult content, unmuted campaigns, phishing, misleading creatives, and a lack of a close button on the landing page.
Preview and campaign editing page
The Campaigns page, as the name suggests, is the repository for all your launched campaigns. Every line is clickable and takes you to the preview and editing page of a particular campaign.
Bulk edit
Our platform also supports bulk editing. Select the campaigns you need and replace the target URL, status, budget, and bids in one go. If you want to customize these parameters individually for every campaign, you’ll have to adjust them one by one.
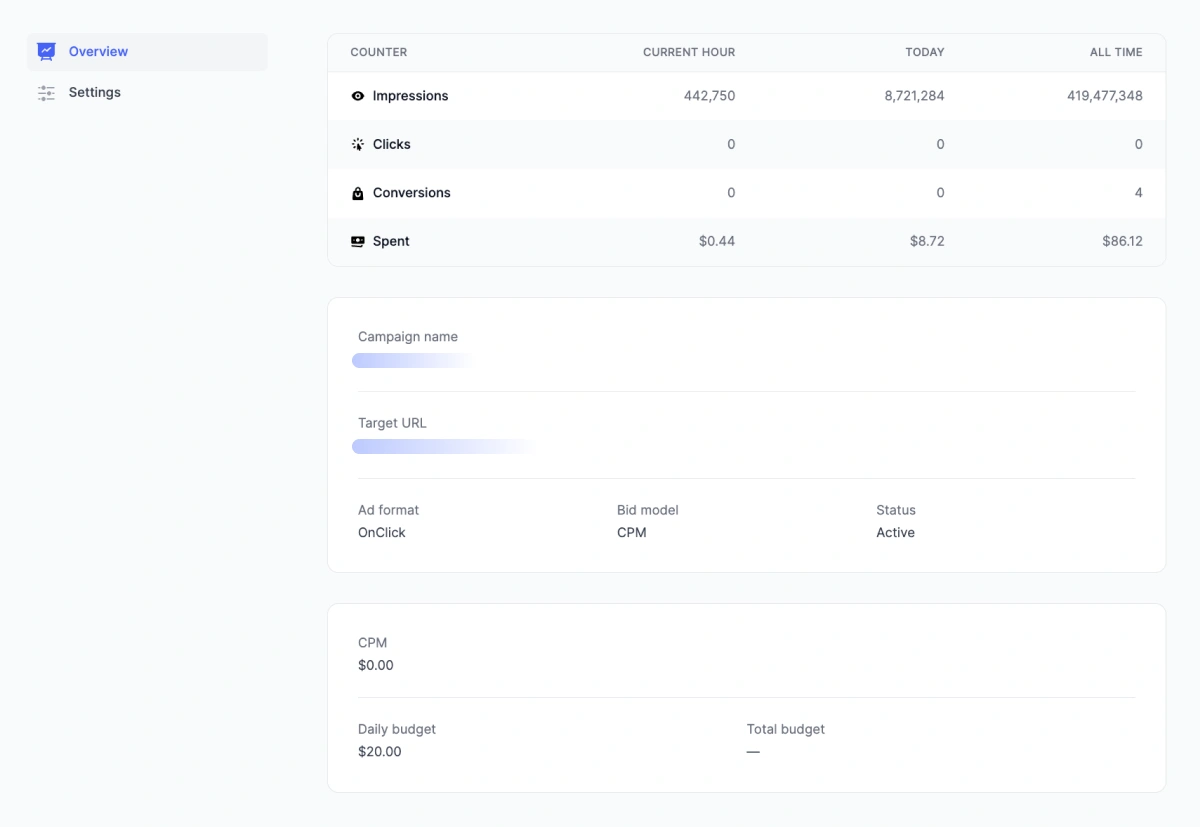
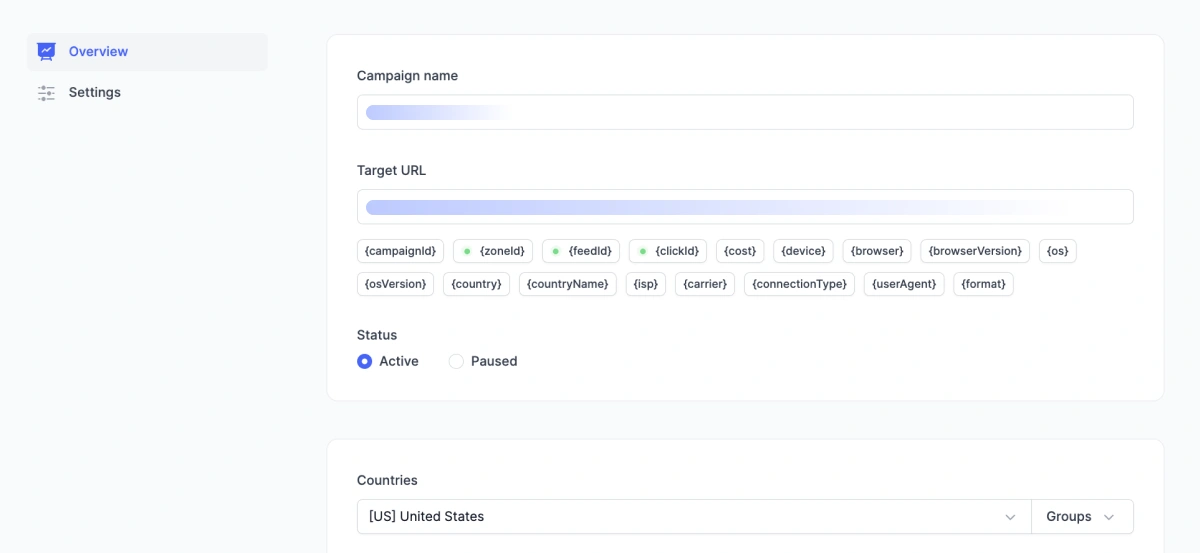
Editing a single campaign
Here, you will find all the data on your campaign and a quick summary of the results, including impressions, clicks, and conversions per hour, day, and total.
From this section, you can access the campaign editor quickly and adjust bidding and targeting to optimize your results.
Important: After saving major changes (like Target URL, GEO, and new creatives), the campaign will be moderated again and relaunched upon success automatically.
Every campaign can be duplicated for a quick launch or sent to the archive if you don’t intend to work with it anymore.
List of campaigns
Having accessed this section, you’ll find the sheet with daily stats for every campaign: impressions, clicks, conversions, CTR, spending, and color indicators for daily and total budgets.
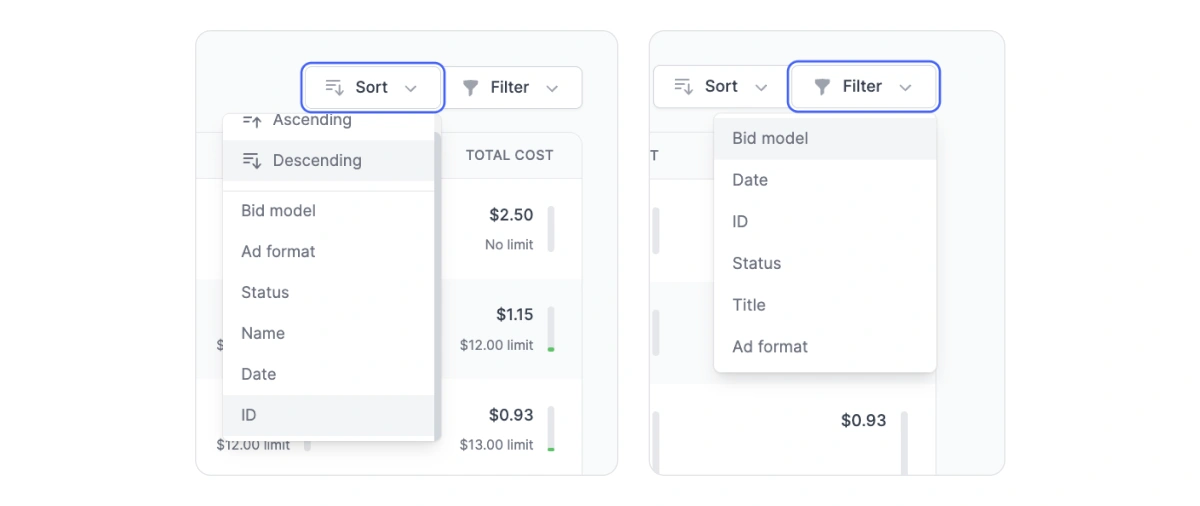
Use filters in the upper header to filter campaigns by format, bid, status, or date.
This whole section helps understand all your campaign details: whether there is traffic coming, clicks made, or budget capped.
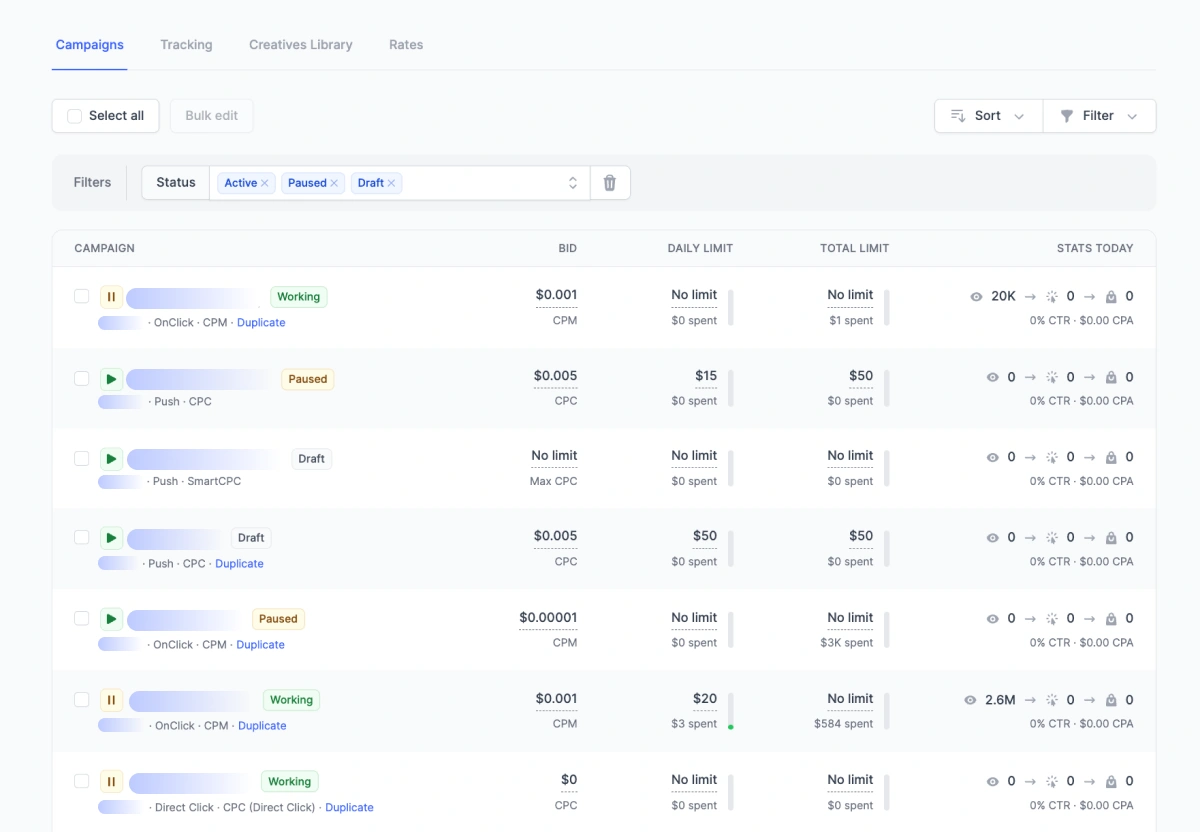
You can also make quick adjustments to bids and budgets without going inside. Simply change the settings directly in the campaign bar. You can pause or duplicate campaigns here as well.
Prior to explaining how to create a campaign, we’d like to elaborate a bit on useful pages that can help understand the inner workings of our platform and what you should do before the launch.
Finance: Balance control and payment history
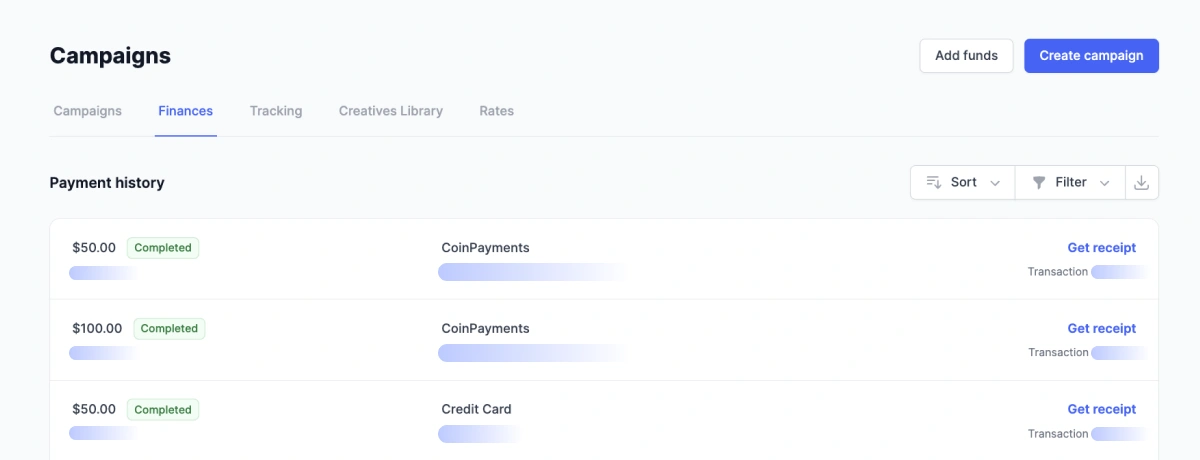
Once you reach this page, you’ll find the history and data on all transactions: sum, status, data, payment method, and wallet address.
In the spreadsheet there, you can also download a receipt for every transaction.
How to add funds
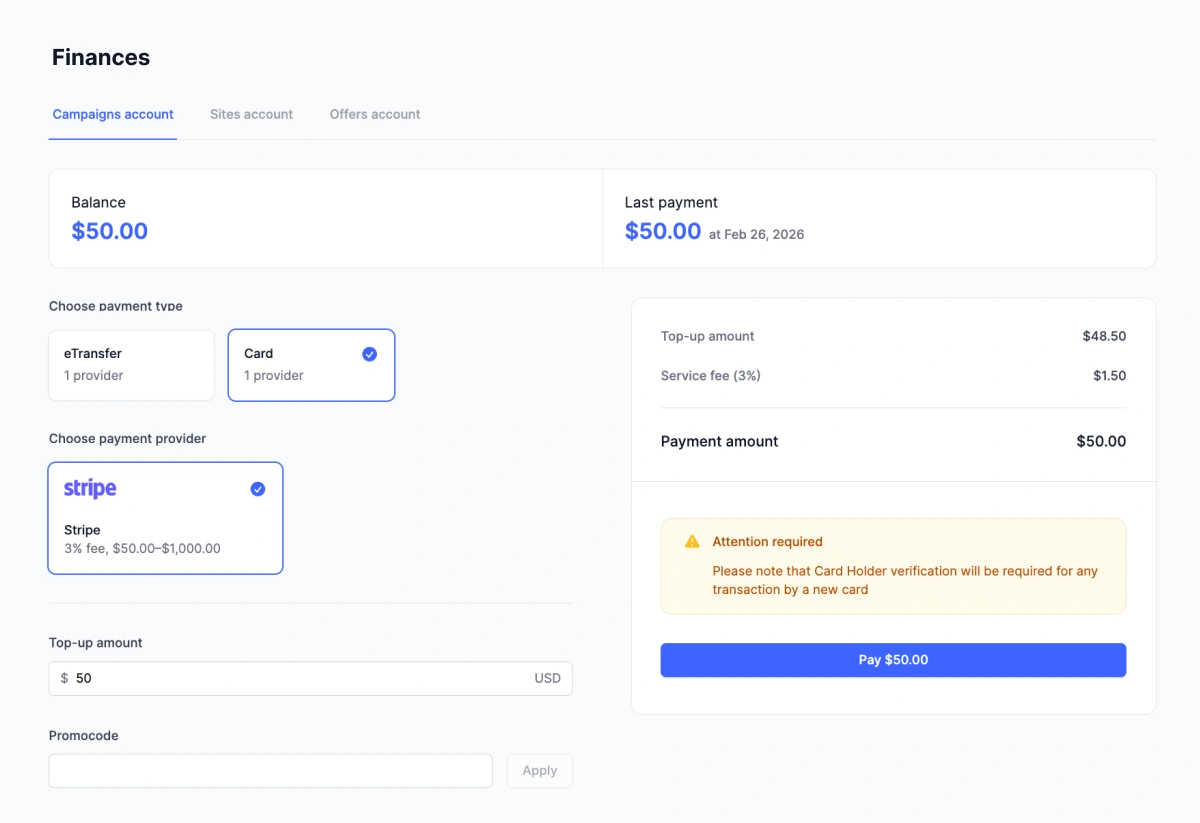
In the upper-right corner, you will find the Add funds button. Click on it to make your first deposit.
The minimal payment is $50 and you can use one of several providers: Paxum, PayPal, Stripe, etc. If you don’t find a convenient option, drop a line either to your account manager or our support team to sort things out.
If you have a promo code, activate it here. The bonus sum will be added to your deposit that has to be at least $50.
The commission amount and payment processing will depend on your provider of choice.
Tracking: Setting up a postback to transfer conversions
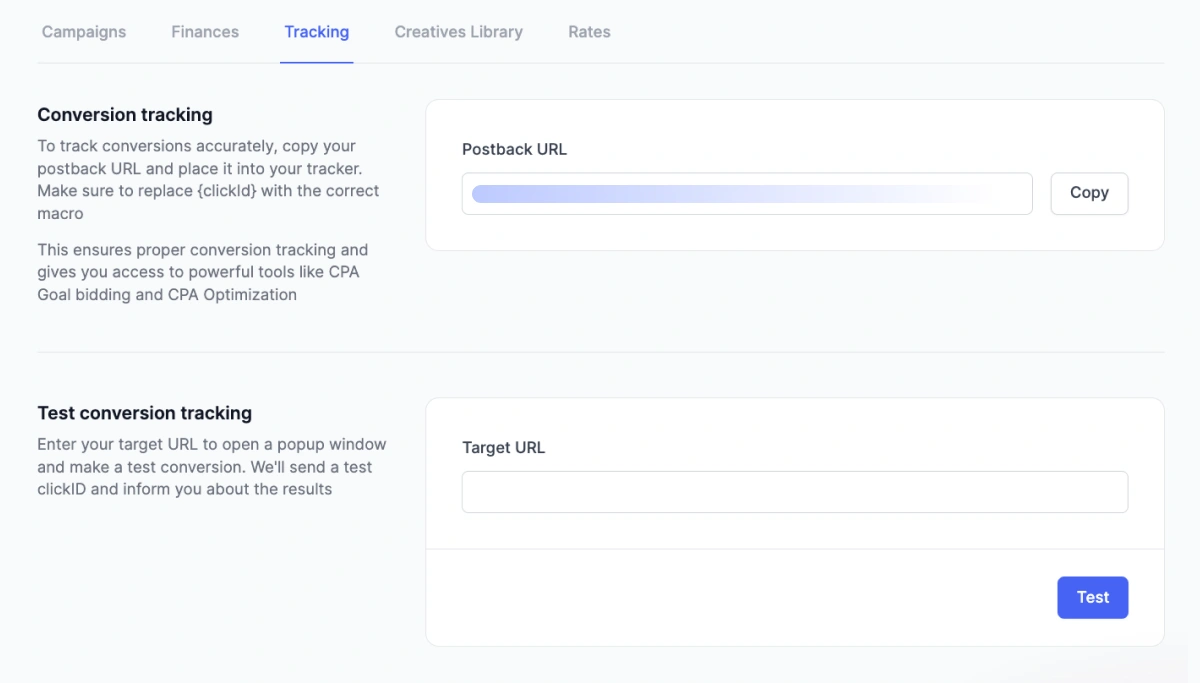
Once you get to the Tracking section, generate your postback URL. Add clickID, conversion_status, payout, and other macroses, then insert your link into the tracker. Without postback, you won’t be able to access CPA Goal, full reports, and some other features.
You get a unique link here to integrate with your preferred tracker. Just copy it, tweak your macro {clickId}, and insert it in your tracker.
There is a way to check if things are set up correctly, just input your link into the target URL and click on “Test”. Although our stats can function without postback, we recommend setting it up to make sure your conversions are tracked and all the optimizations are data-driven. Without postback, your data is incomplete.
With postback, you’ll be able to use CPA Goal, CPA Optimization, and some other features that can automate your bidding strategy and optimization.
Creatives Library: Our In-House Spy Tool
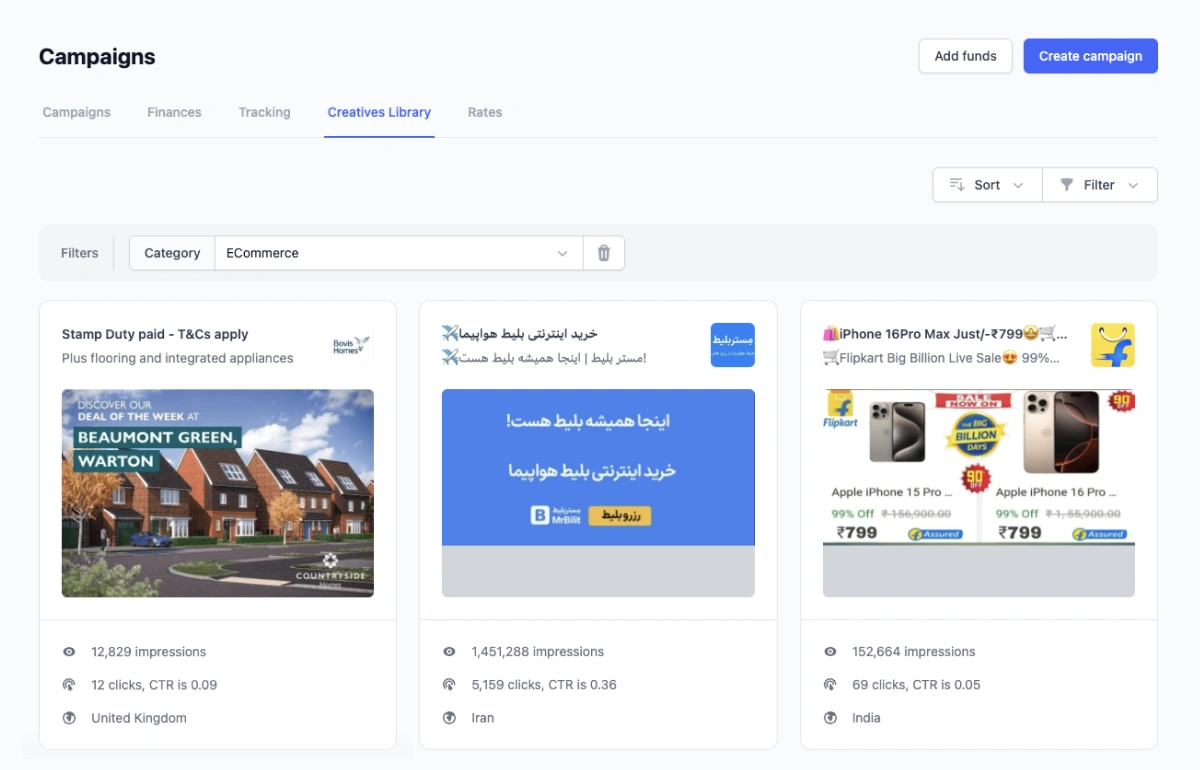
When it comes to Push ads, a good creative is 50% of success. To simplify the creation and search for such creatives, we made our in-house spy tool, featuring creatives for all our main verticals and GEOs.
You can use such creatives either as a source of inspiration to make your own materials or as a readily available alternative to quickly launch a new campaign (or update your old one).
All the creatives can be filtered or sorted for convenient navigation.
Please note that all the creatives are taken from open sources. Our advertisers’ creatives remain private and protected, so your unique approaches will stay with you and only with you.
Rates: Know your optimal bids
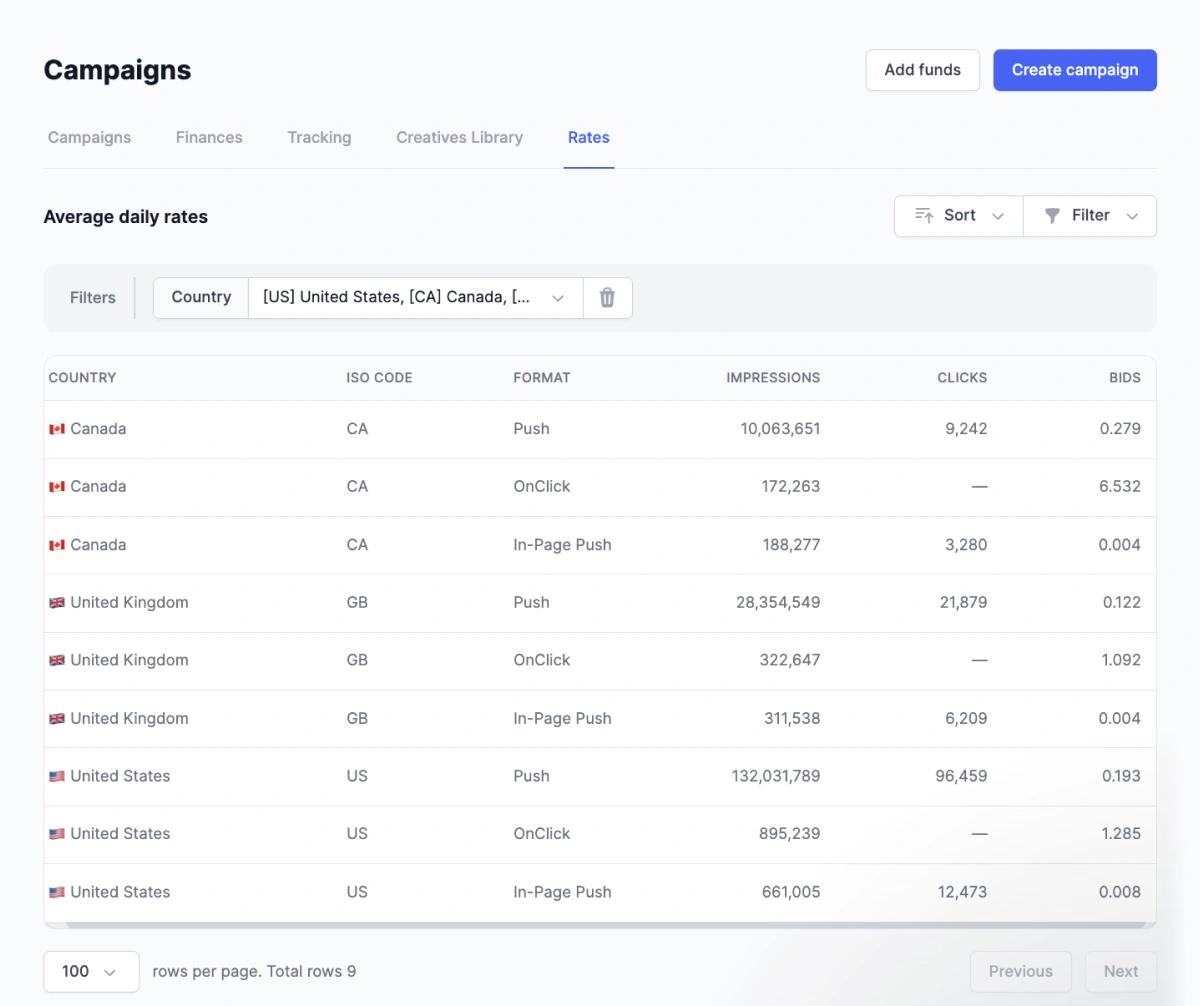
The Rates section displays your average CPM/CPC and traffic volume available per ad format and GEO. Use this page during the pre-planning stage of your campaigns.
The spreadsheet has filters and can be sorted by country and format to find what you need exactly.
Reports: Analytics and optimization
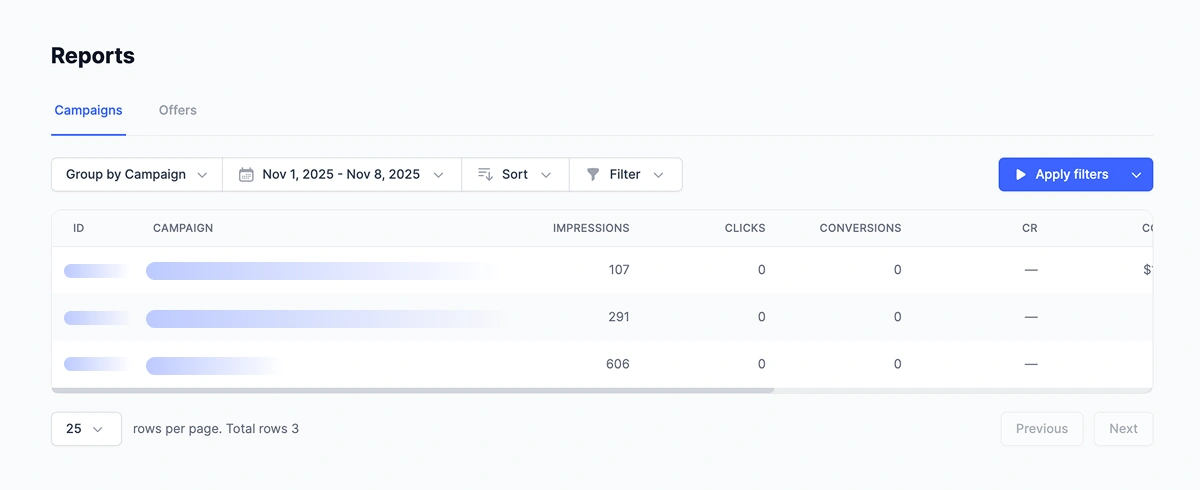
The Reports section displays the results for all campaigns that you’ve ever worked with. The spreadsheet features sorting by offer (but you can change it to something else).
What you can do:
- Change period (day/week/month/custom).
- Group by campaign, creative, format, zone, feed, county, platform (device), subscription age or period (hour/day/week/year).
- Sort and filter by format, bid model, status, title, ID.
- Download the report in CSV for analysis.
The difference between campaigns and reports
The Campaigns tab displays stats for each campaign’s current day. Find full analytics in Reports with the stats from the past, including yesterday, last week, and last month.
Campaigns are for monitoring your new launches, but for more detailed stats, it’s better to refer to Reports.
Cross-roles: Offers and Sites
Last but not least, let’s discuss extra roles.
An important and unique part of our platform is that when you make an account to work with campaigns, you can also set up extra sections, namely Offers and Sites.
With RollerAds, you can use a single account to profit in three ways:
- Campaigns. Launch your ad within our platform itself—pick an offer, add funds to your account, and launch a Push/In-Page/OnClick/Direct Click campaign.
- Offers. A built-in CPA network with high-performing offers. Affiliate marketing at its best.
- Sites. Connect Push notifications/OnClick (or Back Button functionality) to your landing page and get passive income from subscriptions. If you have a full-scale website, your monetization options become even broader.
Campaigns → Offers: pick an offer, copy the link from it, paste it in your Target URL—launch the ads for a verified product.
Campaigns → Sites: monetizing the database of subscribers with push notifications brings passive income that can be redirected to the advertiser’s balance with a single click.
Next steps
- Read other articles in our blog, head to FAQ, or contact your account manager (find the icon in your dashboard). Subscribe to our social networks and join the Telegram chat (all the links are below).
- Set up your postback and wallet if you haven’t yet.
- Pick an offer → run some traffic → watch your first conversions in stats.
Good luck, and may the conversions roll in! 🌀